

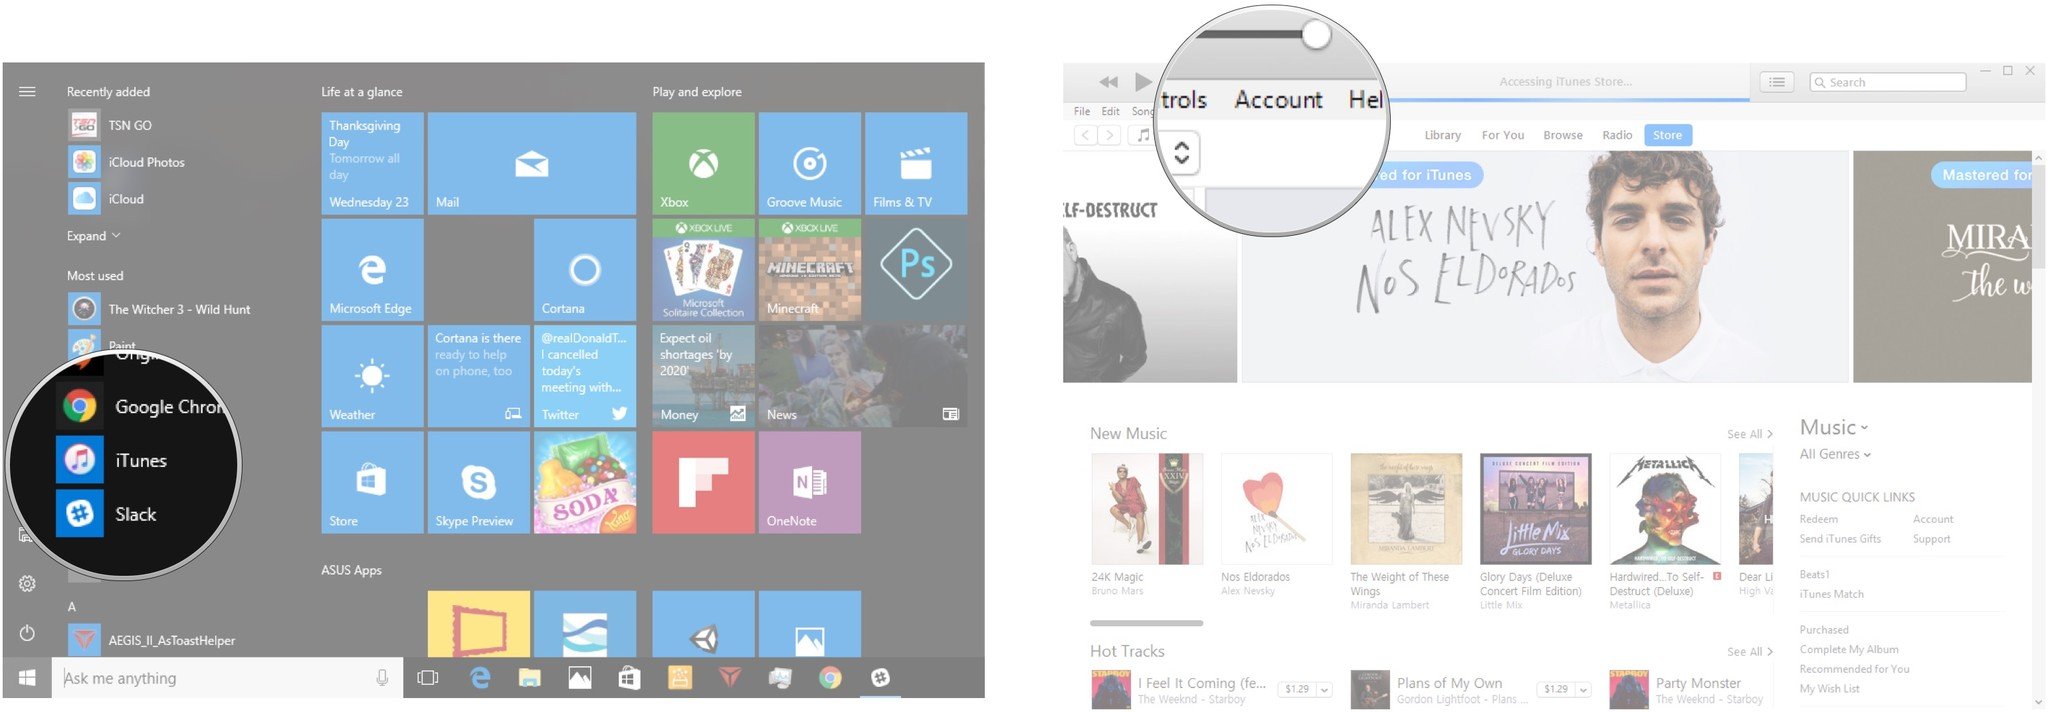
How To Install Itunes On Windows Pc
So you have a fresh install of Windows 10 and your start stop is making sure your media library is taken intendance of. Here'southward the quick and easy manner of getting the latest version of iTunes installed. We'll even help you make sure your music, photos, videos, and other media are identified by iTunes and then you lot can first enjoying it right away.
- How to download and install iTunes for Windows 10
- How to create an Apple ID account and log in on Windows 10
- How to authorize your computer in iTunes on Windows 10
- How to import your media library into iTunes on Windows 10
- How to buy from iTunes on Windows x
- How to subscribe to iTunes Match on Windows 10
- How to subscribe to Apple Music 0n Windows 10
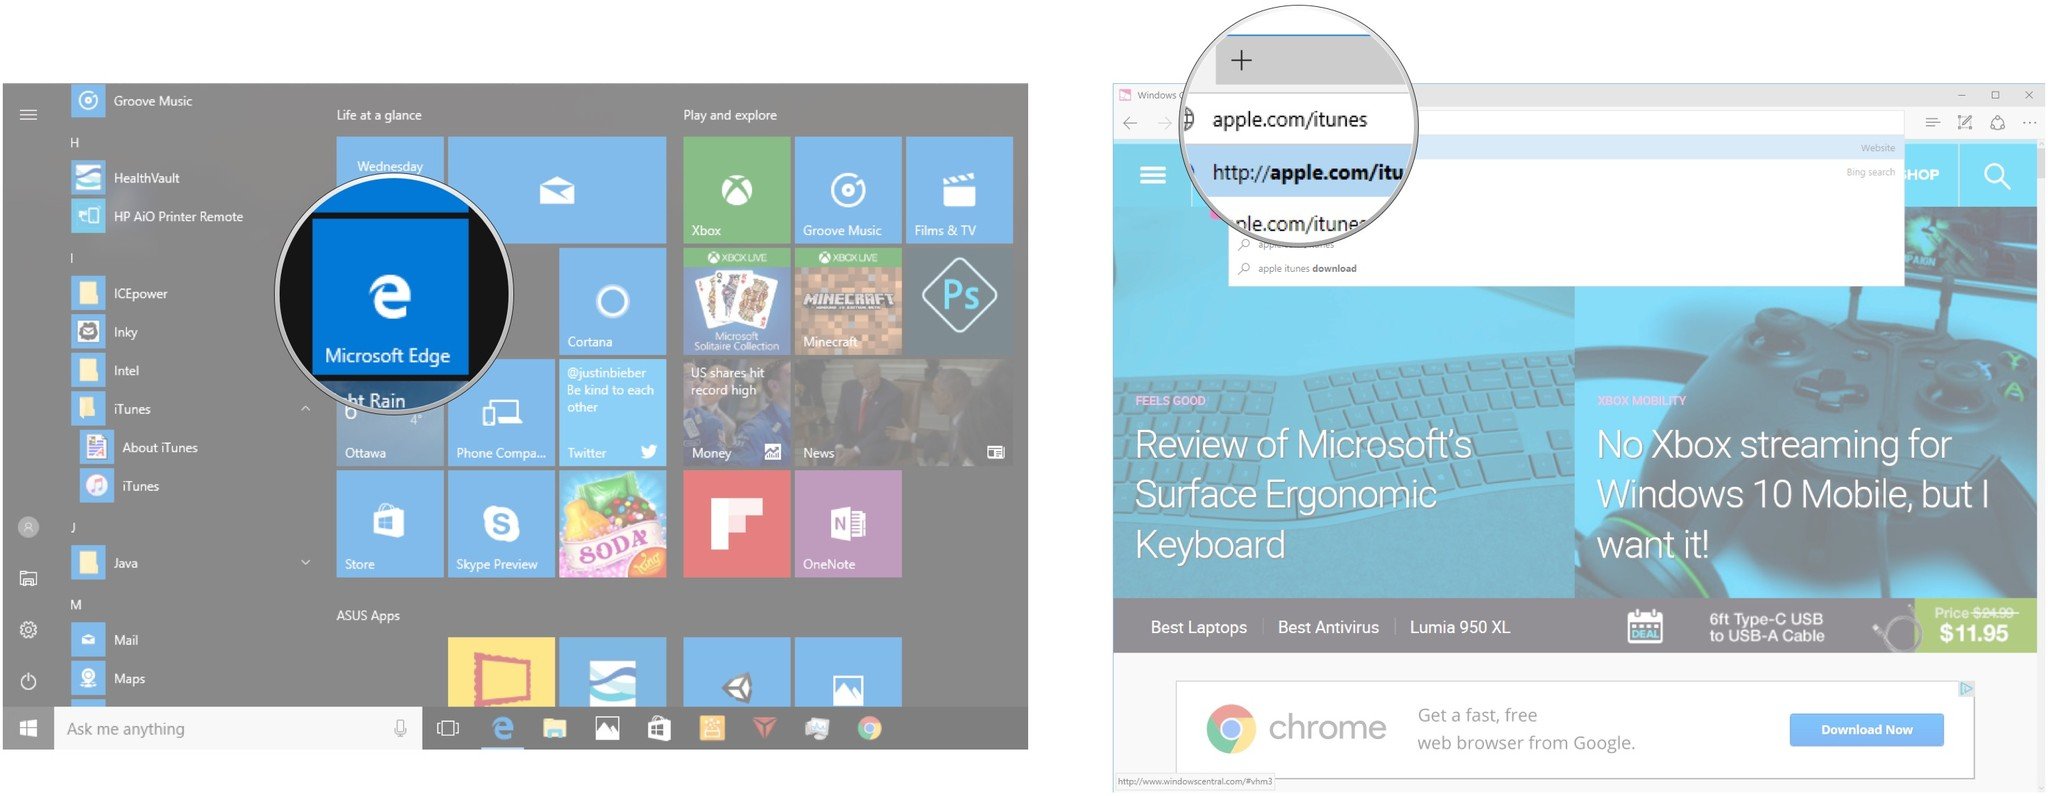
How to download and install iTunes for Windows ten
- Launch your favorite web browser from the Start bill of fare, taskbar, or desktop.
-
Navigate to www.apple.com/itunes/download.
- Click Download Now. You lot might have to scroll down a scrap.
-
Click Save. iTunes will now download.
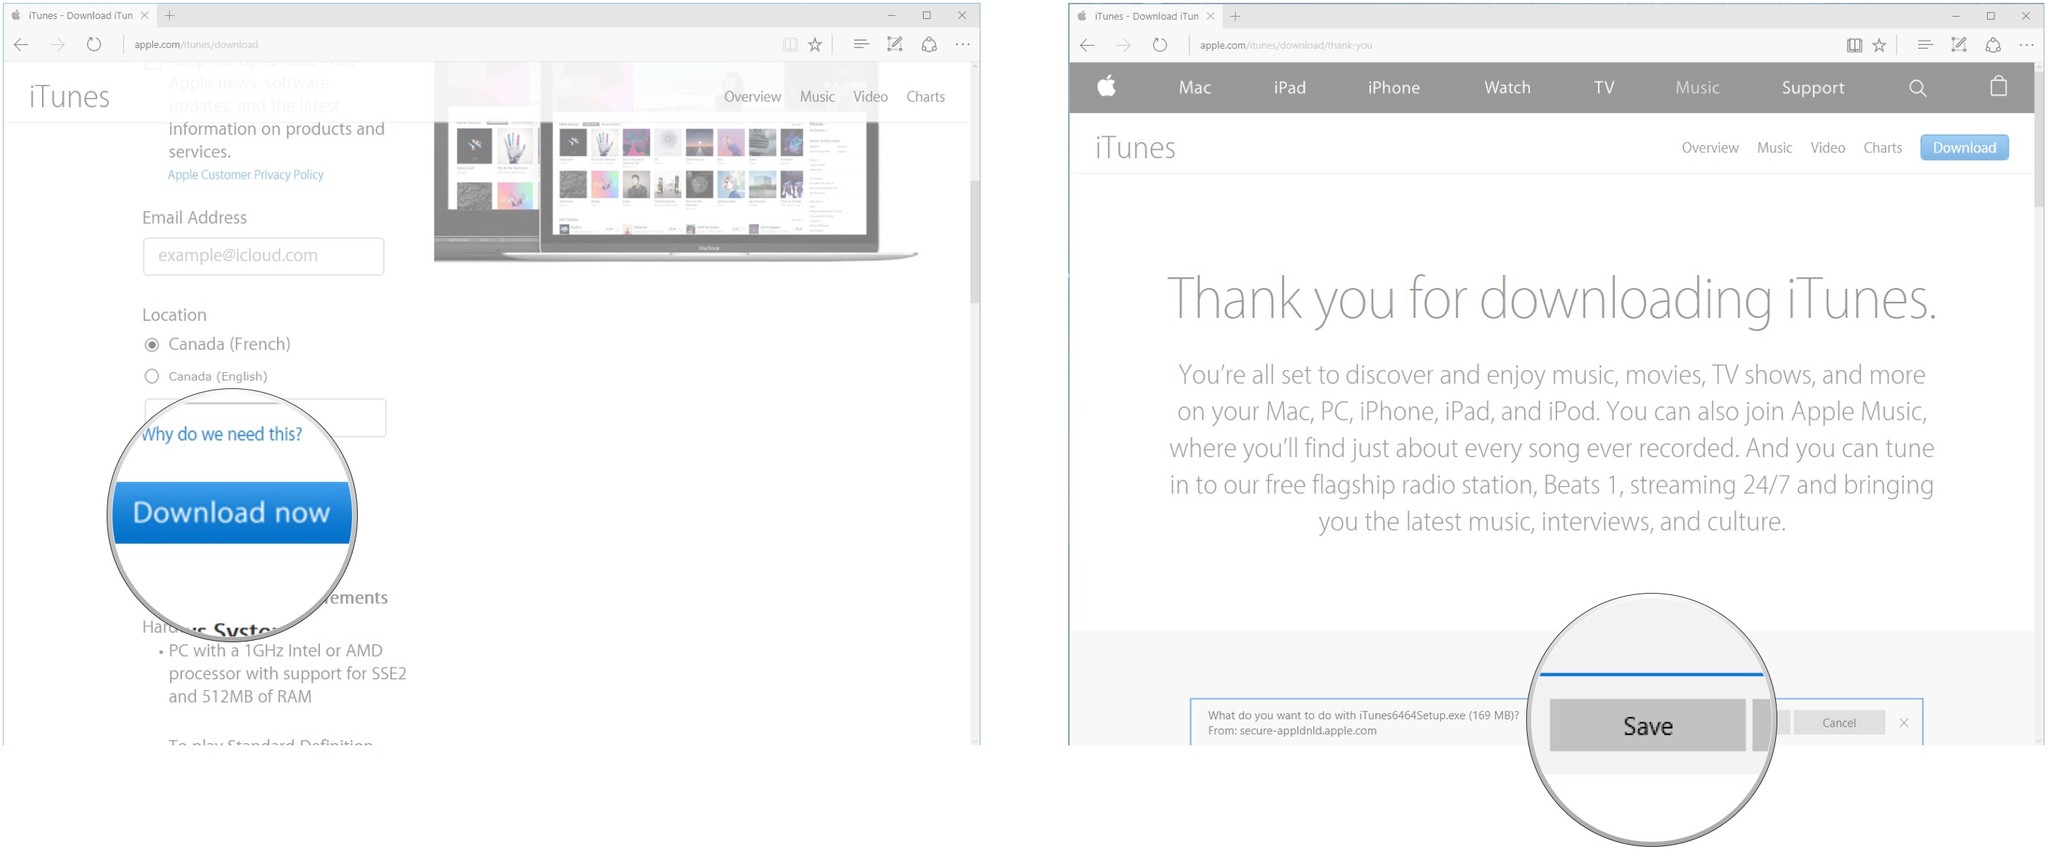
- Click Run when the download is complete. The iTunes installer volition open.
-
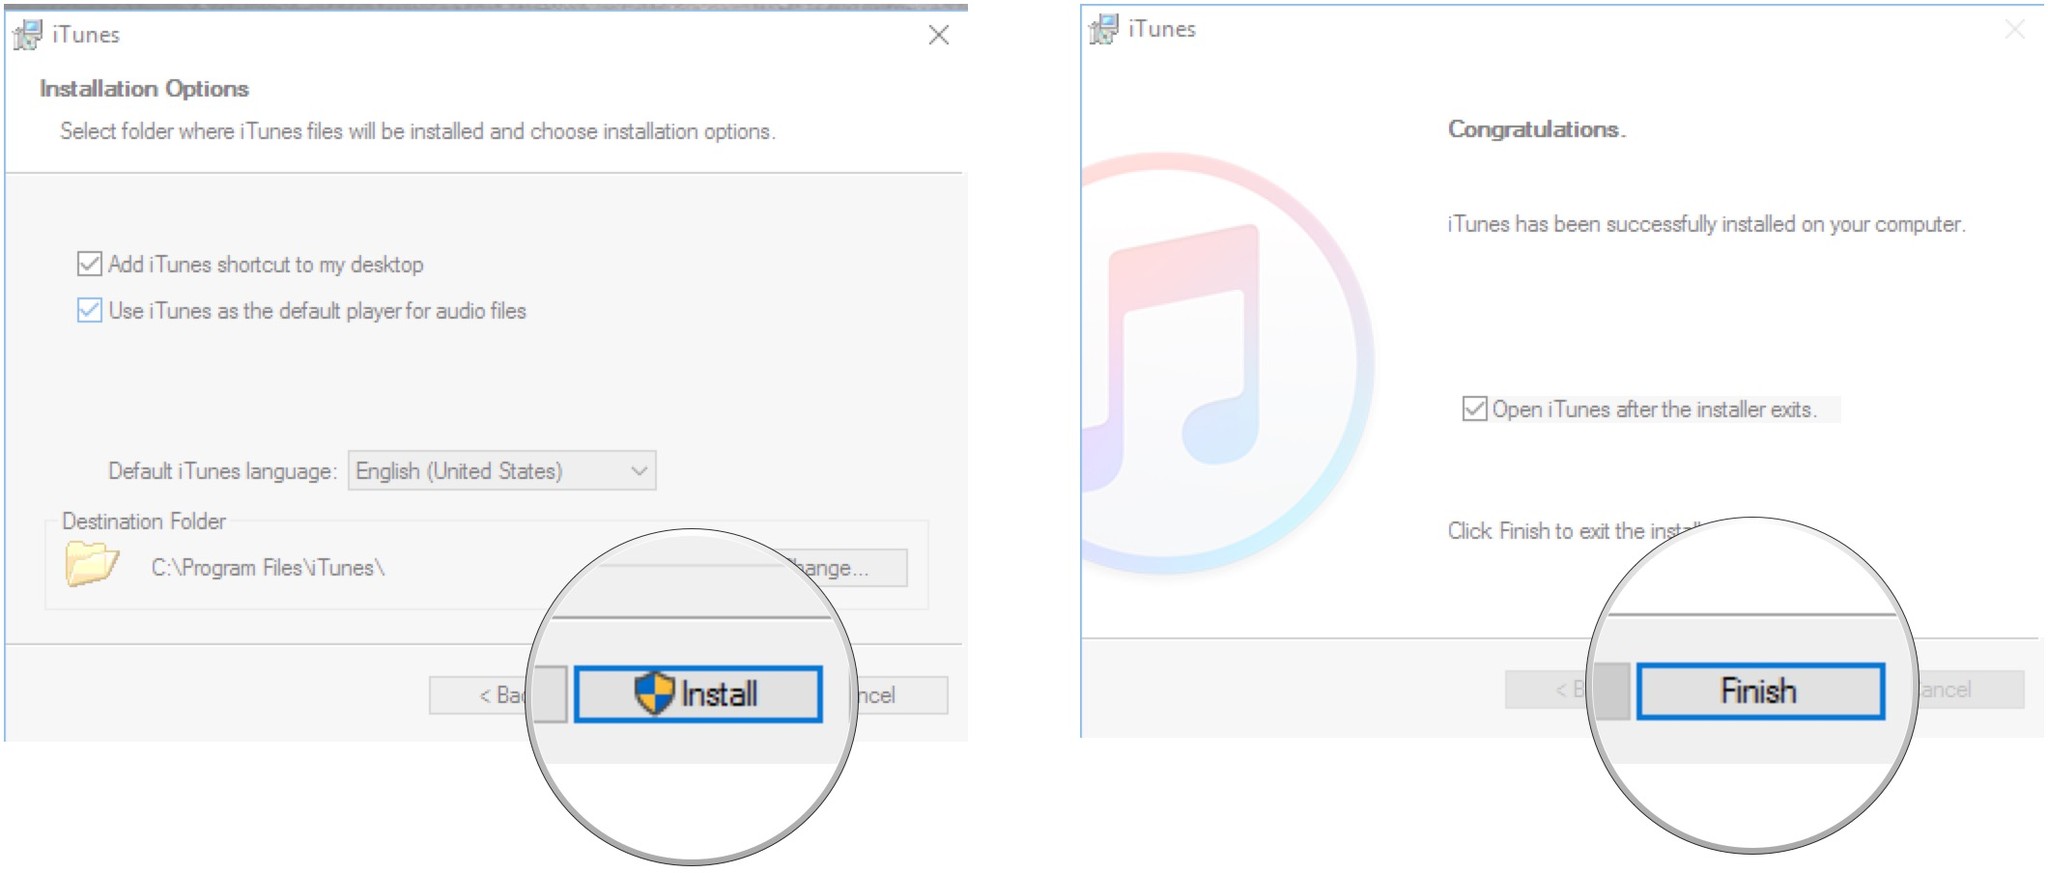
Click Next.

- Click Install when you're satisfied with the installation parameters.
-
Click Finish.


How to create an Apple tree ID business relationship and log in on Windows 10
You lot'll demand an Apple tree ID to buy music and download apps. If you haven't already made an Apple ID on your iPhone or iPad, it's possible to do then through iTunes on Windows quite easily.
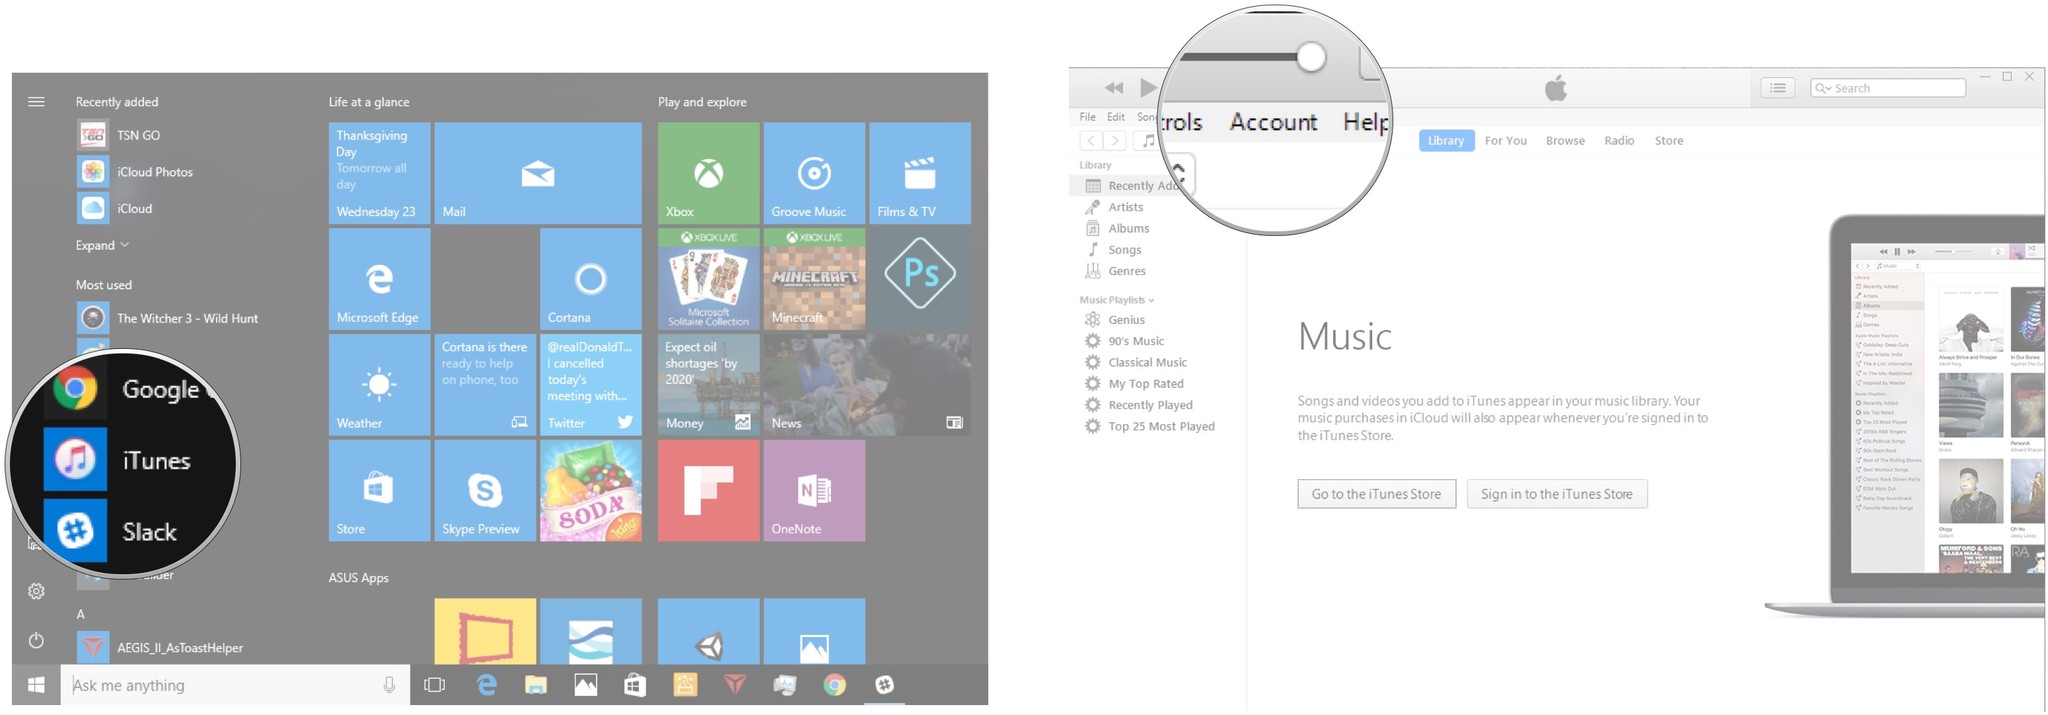
- Launch iTunes from your desktop, First menu, or taskbar.
-
Click Account from the bill of fare virtually the pinnacle-left corner of the window.
- Click Sign In.
-
Click Create New Apple tree ID. If you already take an Apple tree ID, you can sign in from here instead.
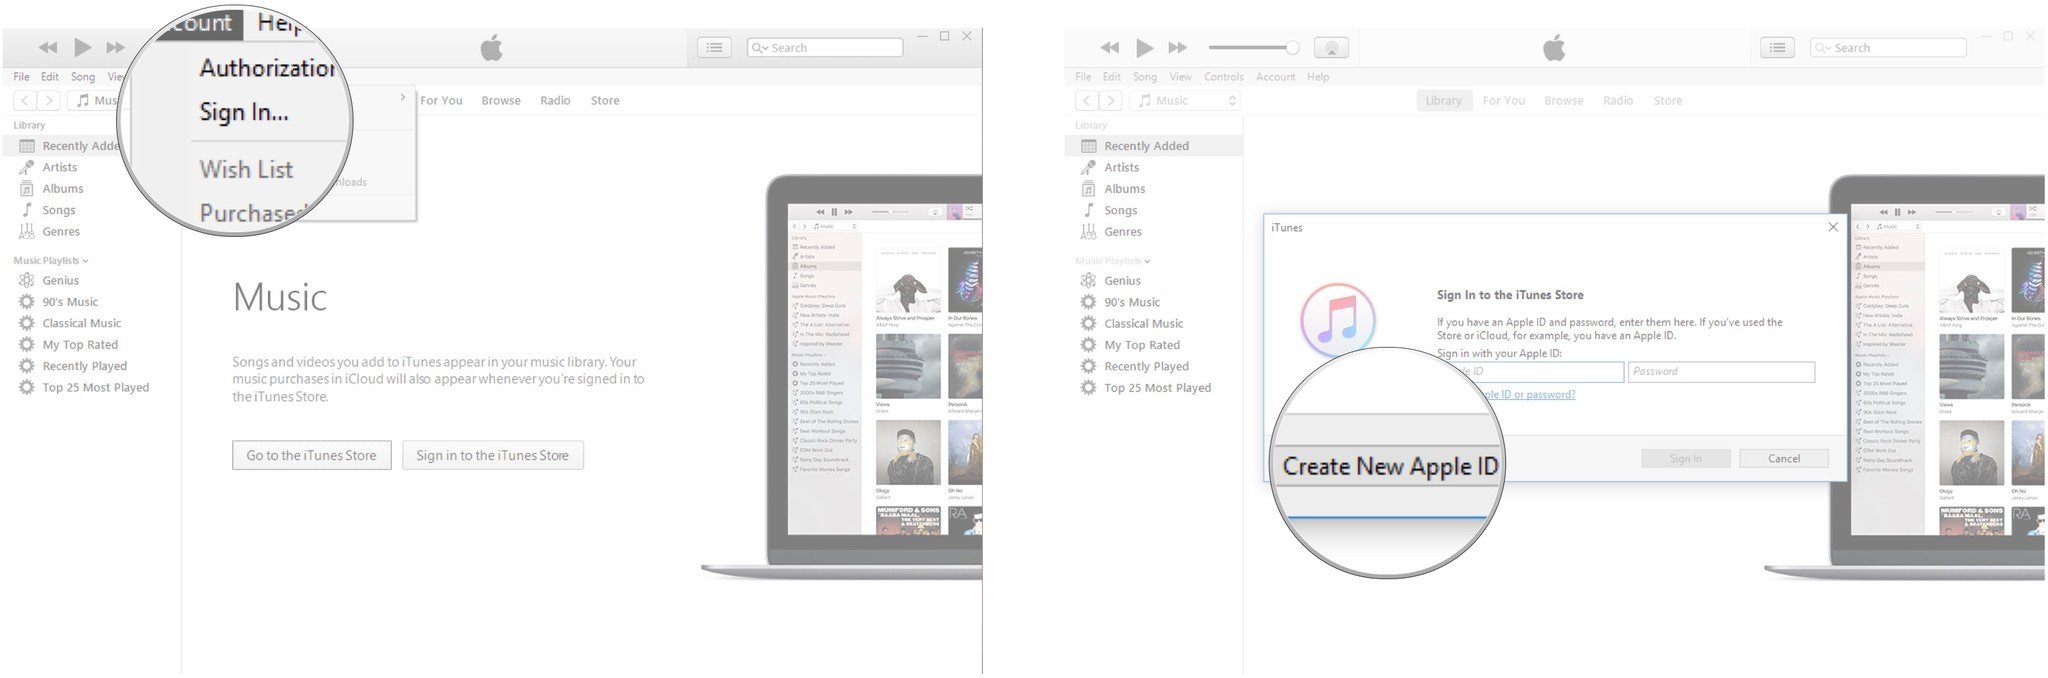
- Click Go on.
-
Click the checkbox next to I have read and agree to these terms and conditions and then that a checkmark appears.
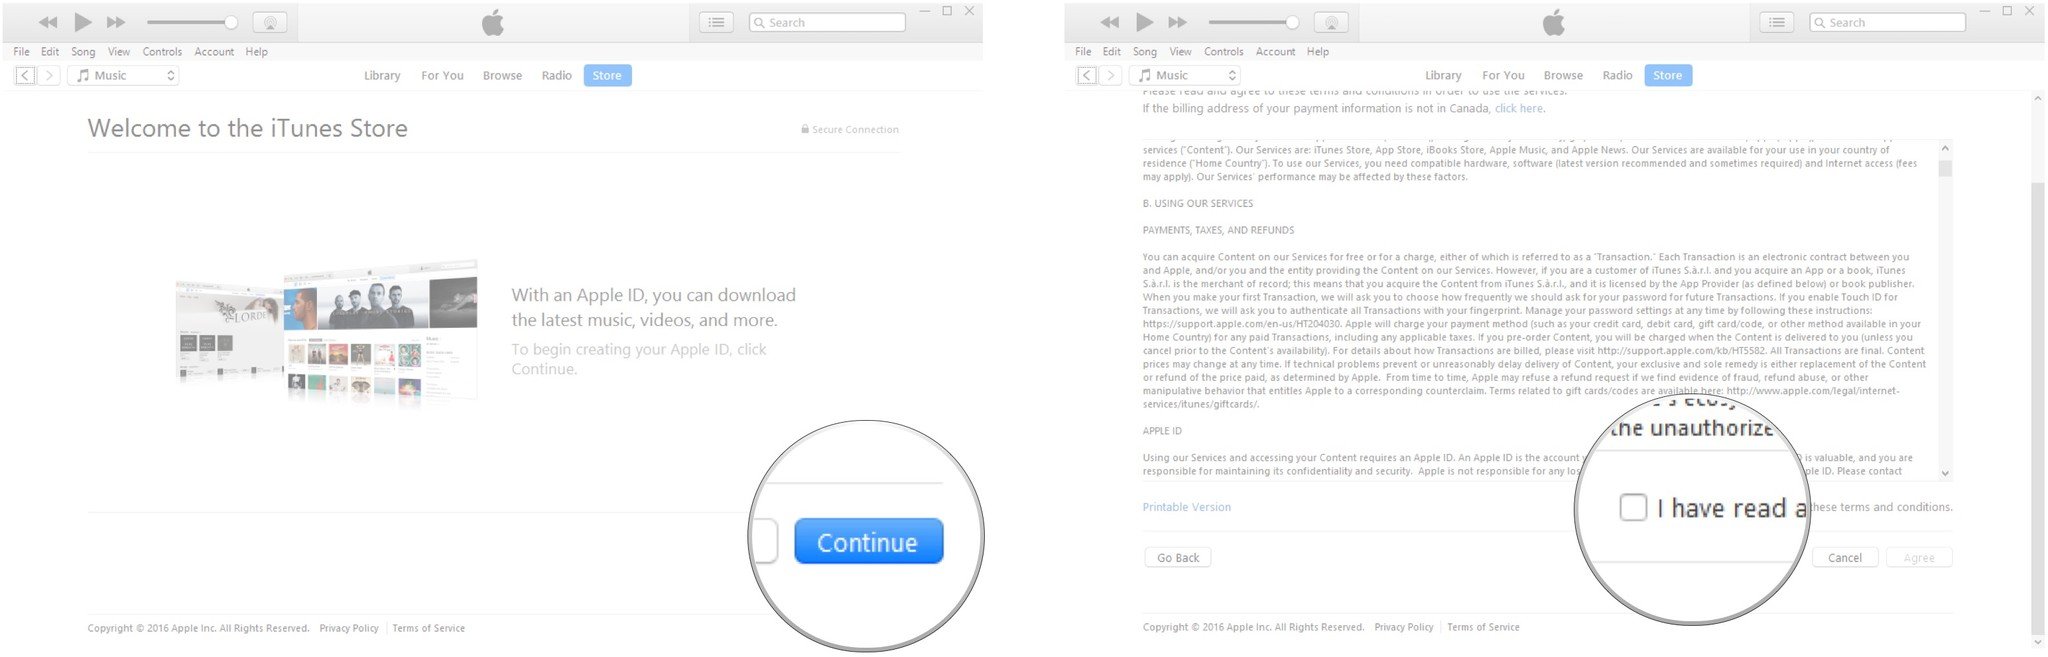
- Click Agree.
-
Type your email address.
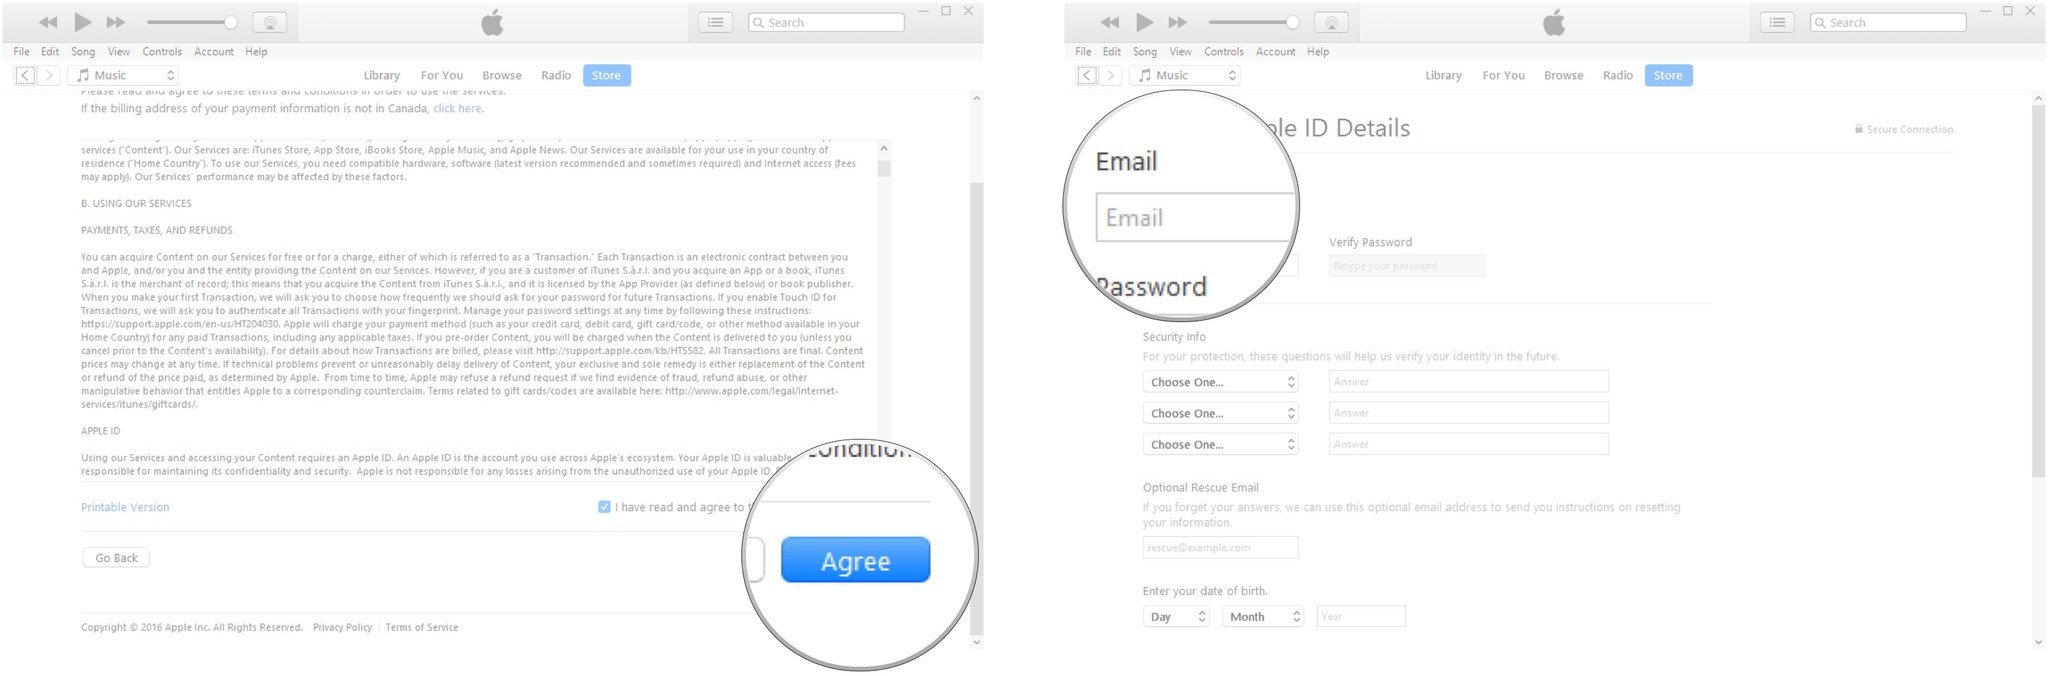
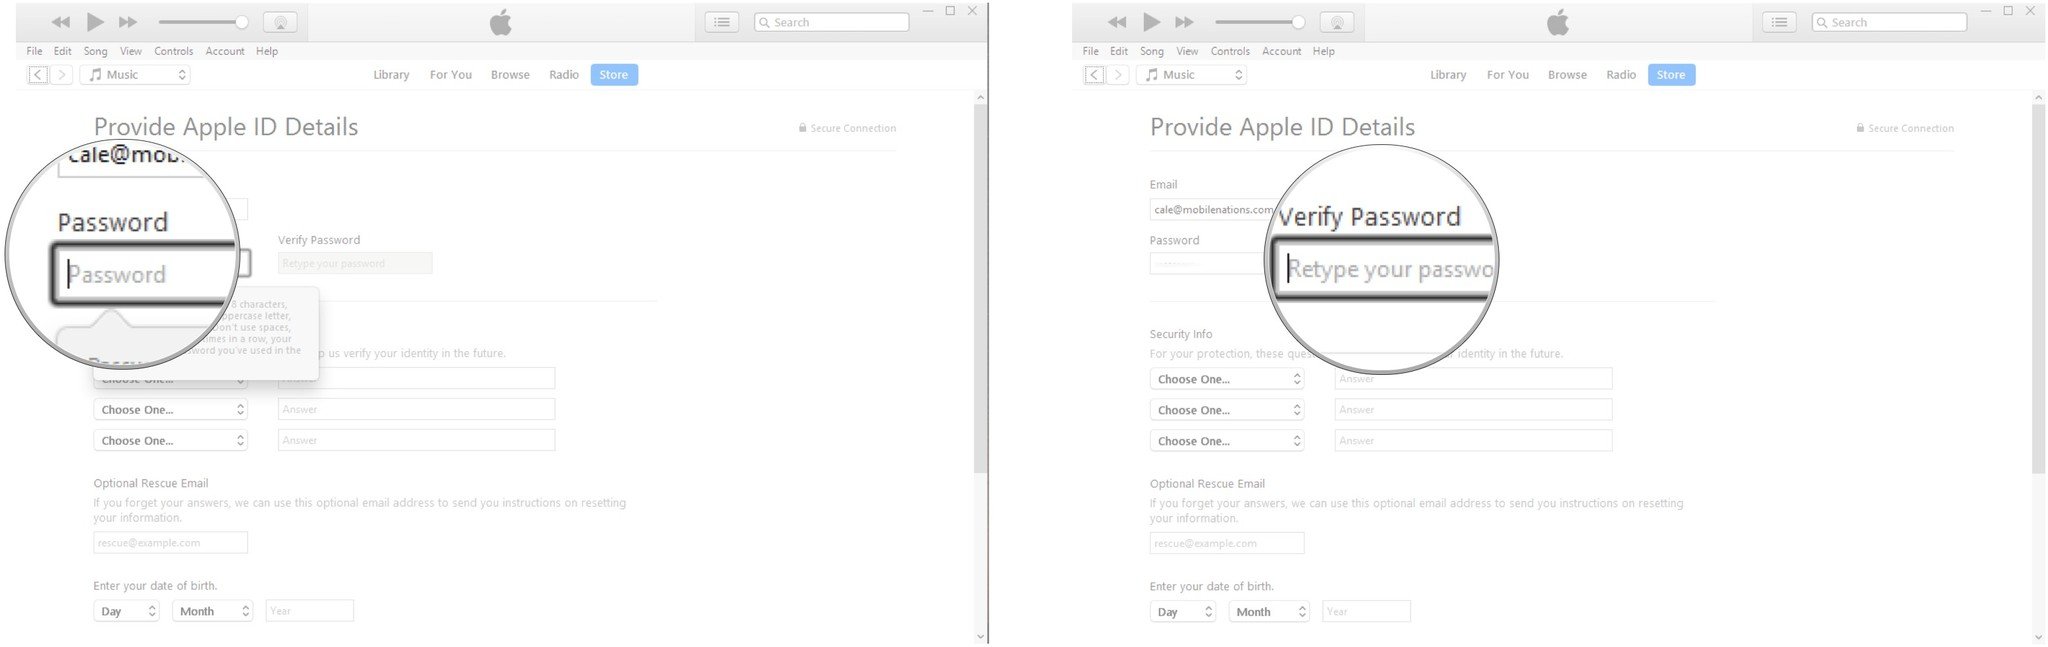
- Type your password.
-
Blazon your password once again to verify.
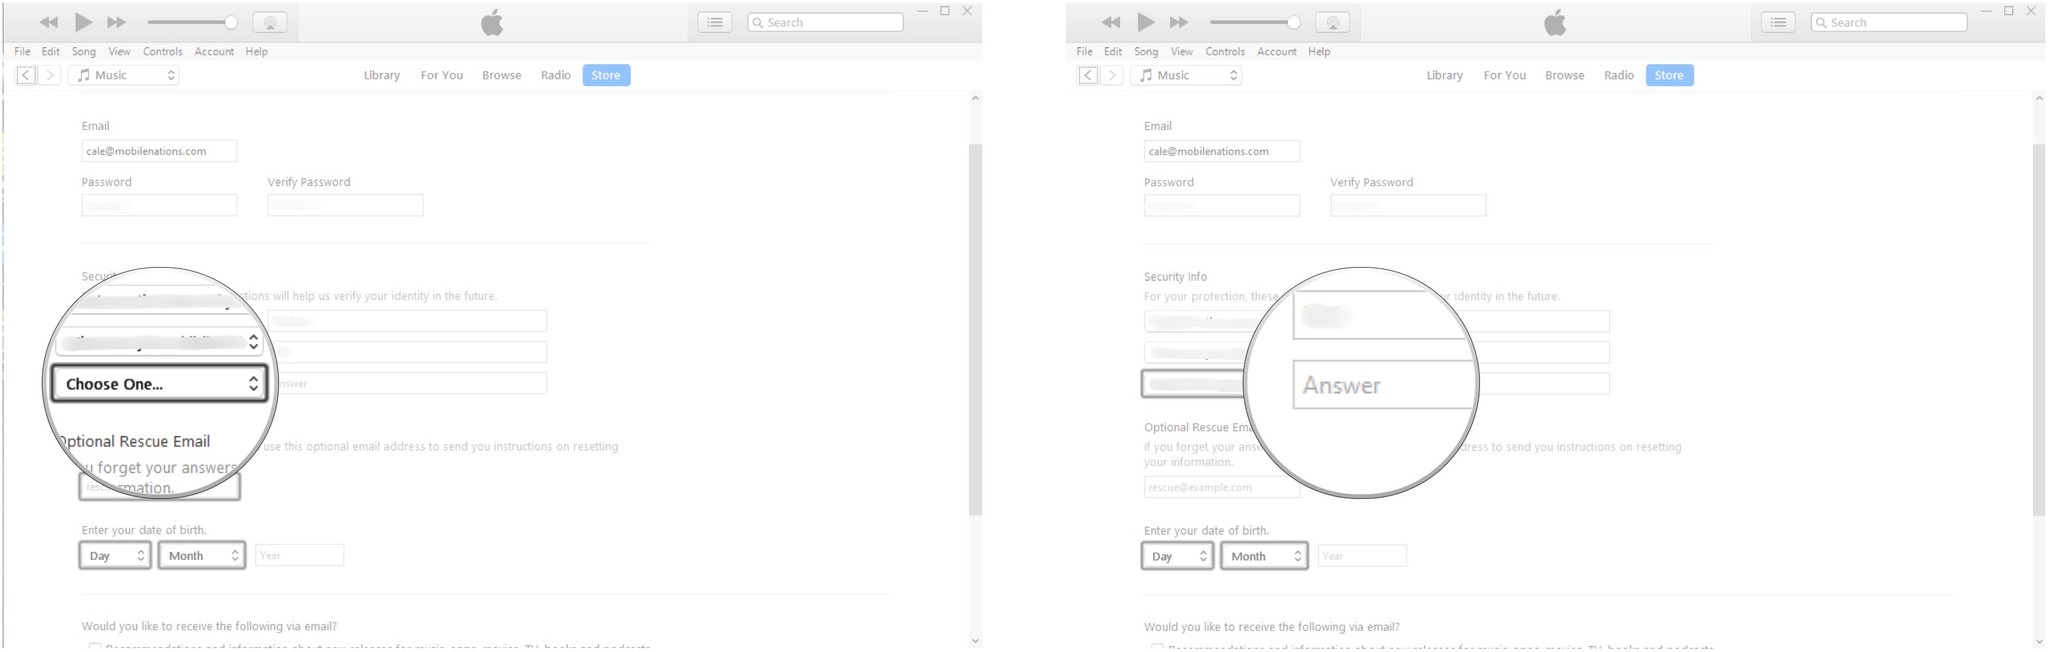
- Click the dropdown pointer next to Choose One and choose a security question.
-
Type an reply to the security question.
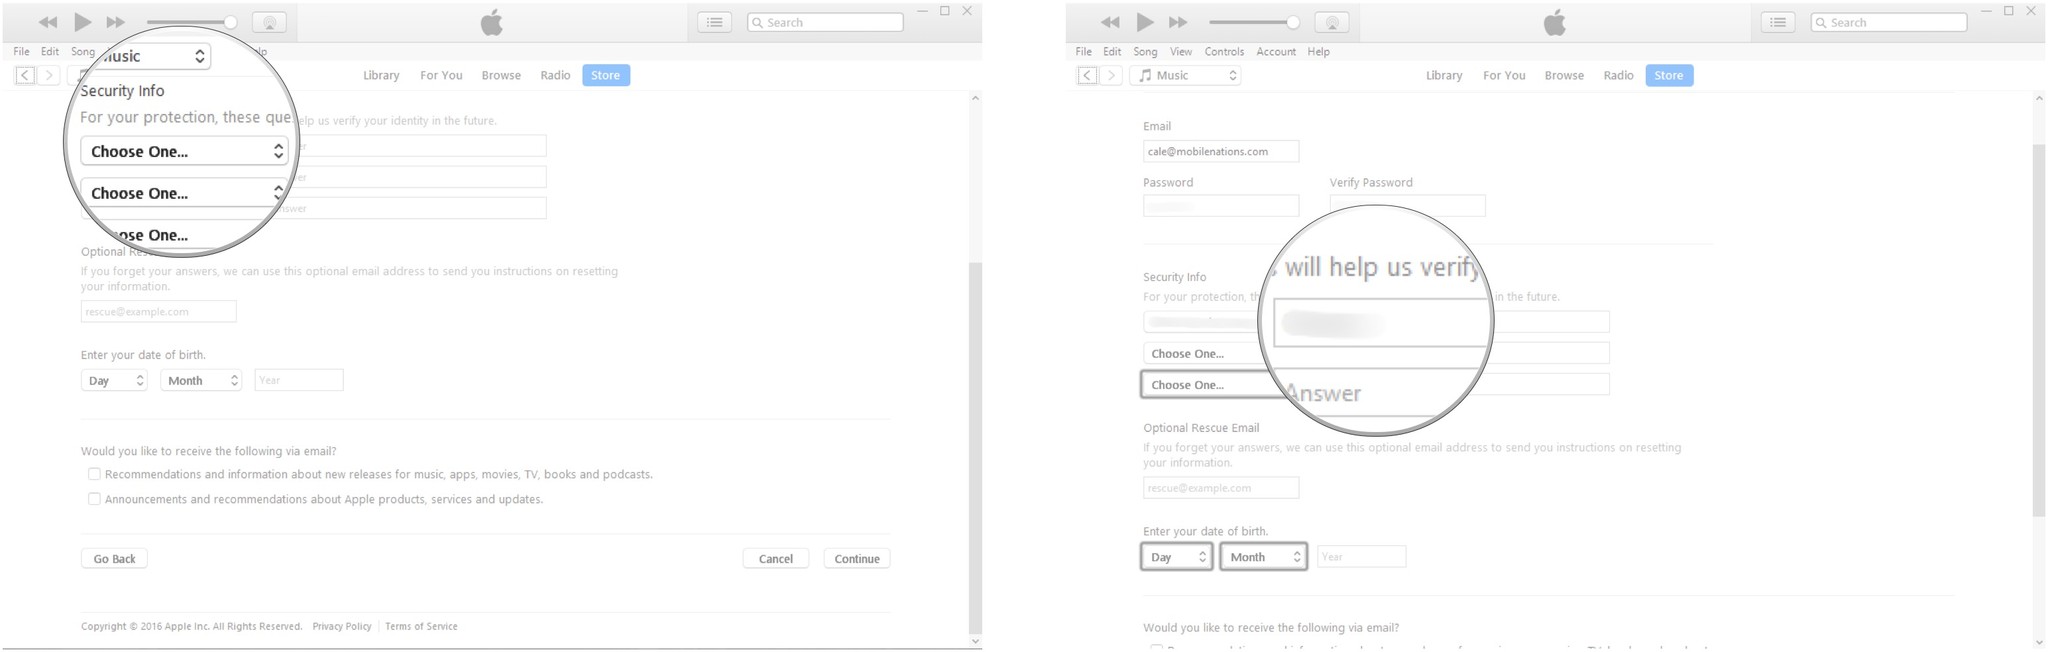
- Click the dropdown arrow next to Cull One and cull a security question.
-
Type an respond to the security question.
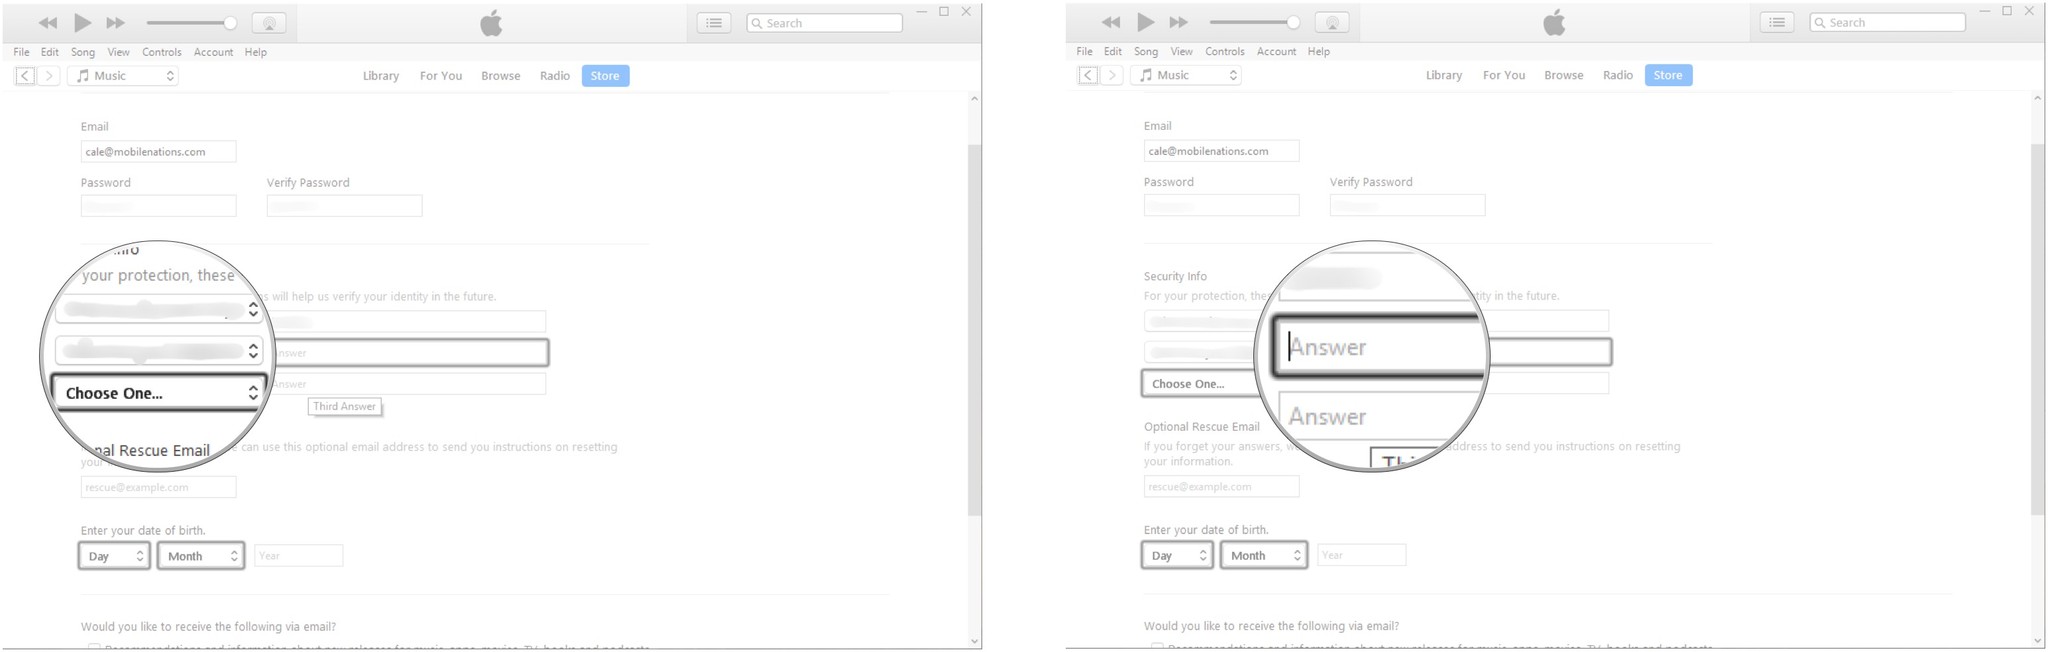
- Click the dropdown pointer side by side to Choose One and cull a security question.
-
Blazon an answer to the security question.
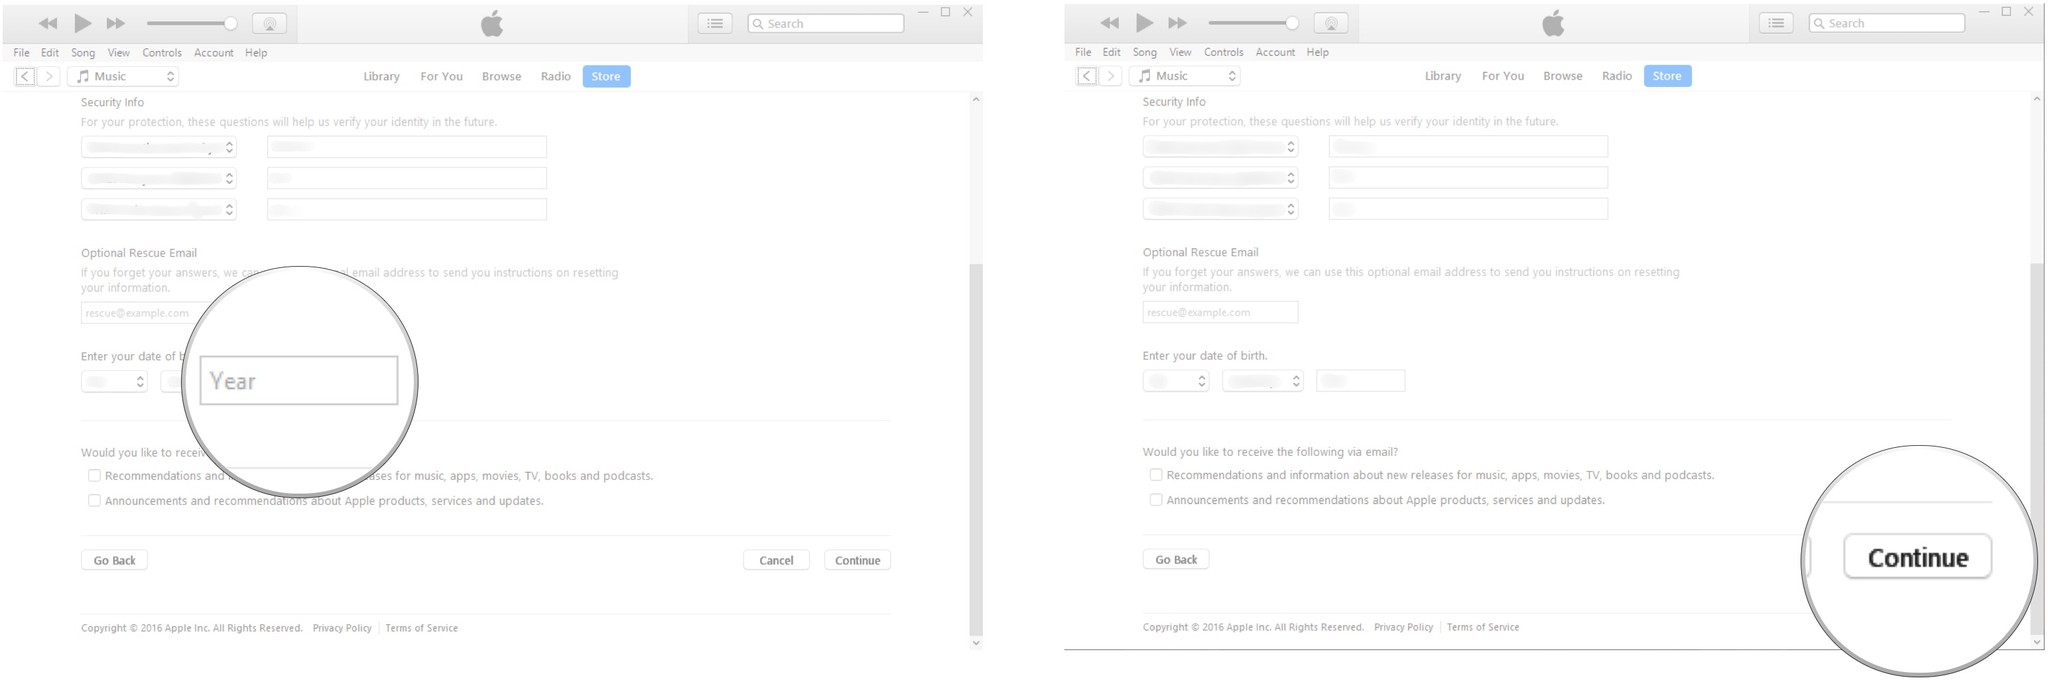
- Click the dropdown arrow adjacent to Solar day.
-
Click a number.
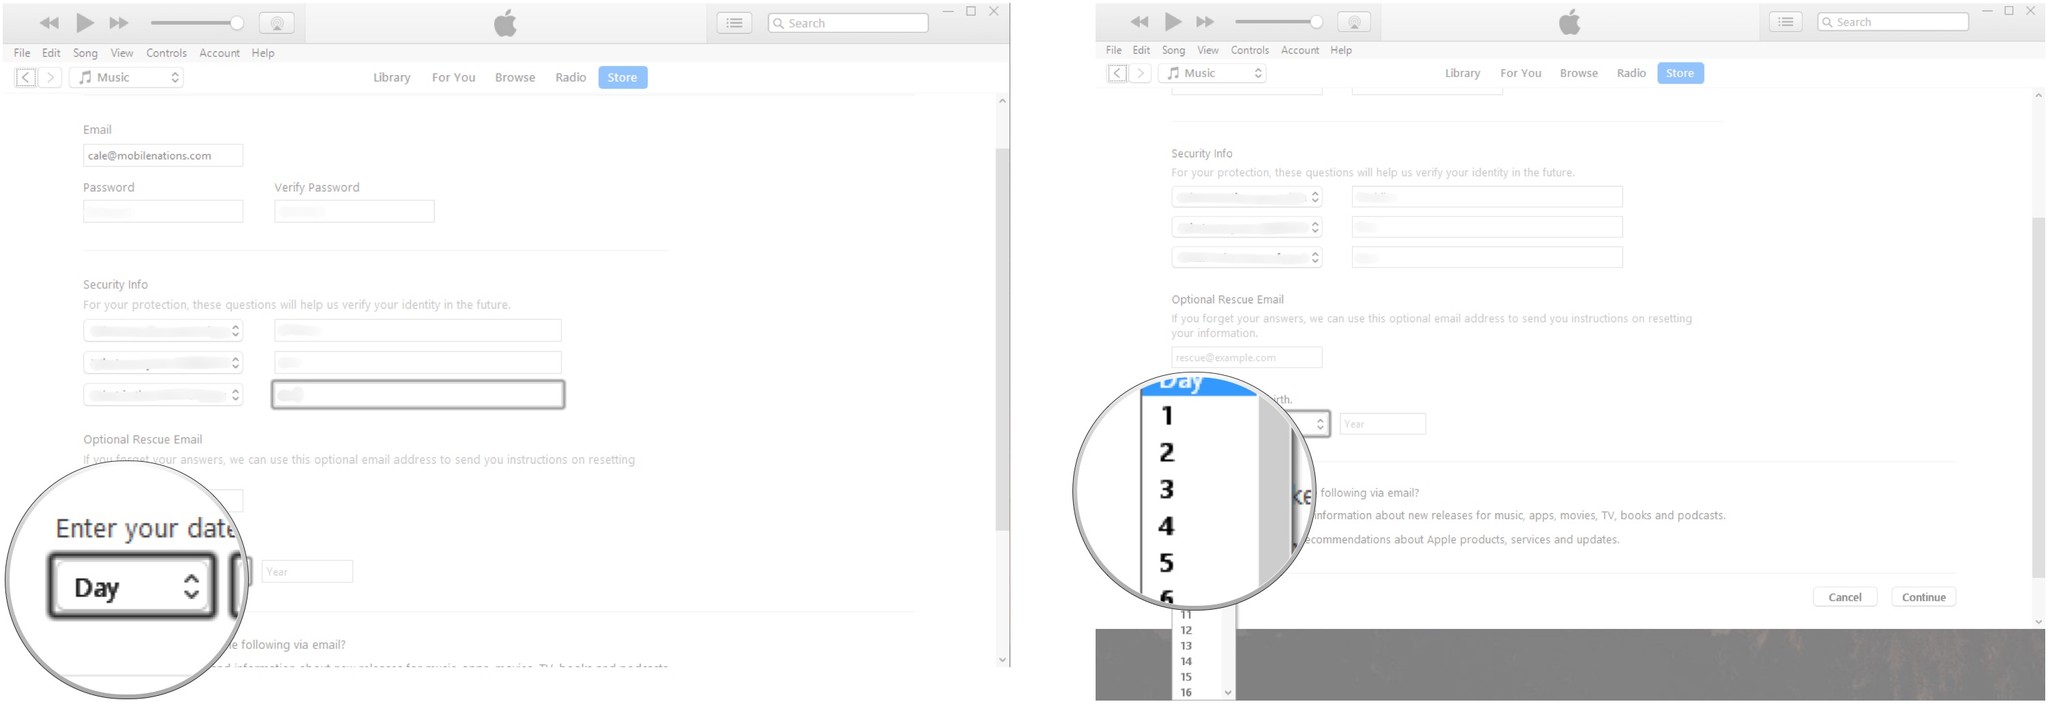
- Click the dropdown arrow next to Calendar month.
-
Click a calendar month.

- Type a year in the Year field.
-
Click Keep.


You volition at present be asked to submit your billing data.
- Click a payment option.
-
Type your card number.

- Click the dropdown arrow under Expires.
-
Click the death calendar month.
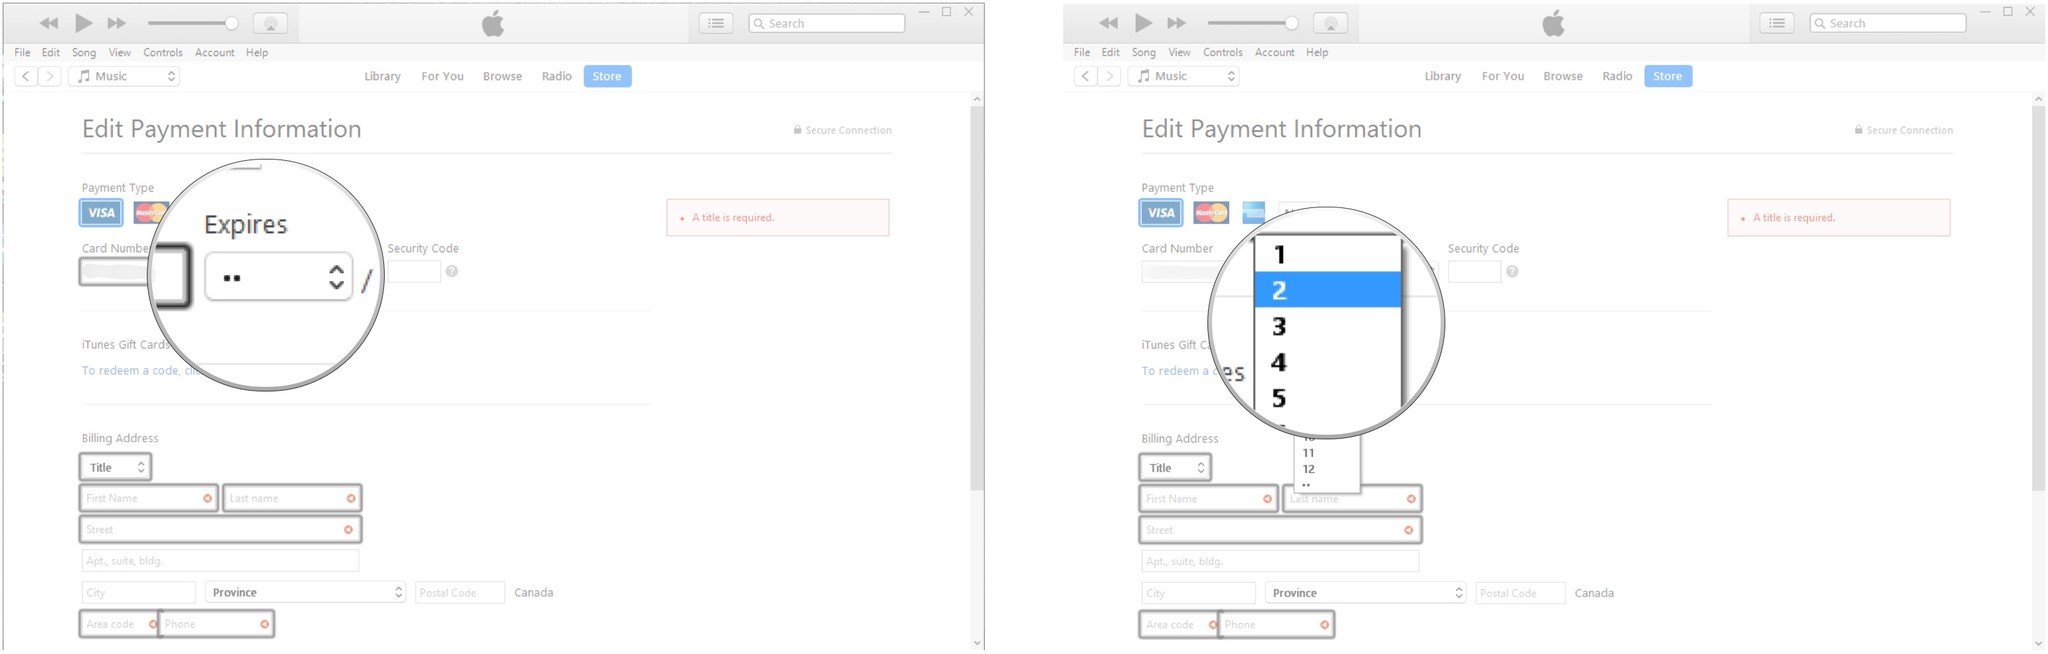
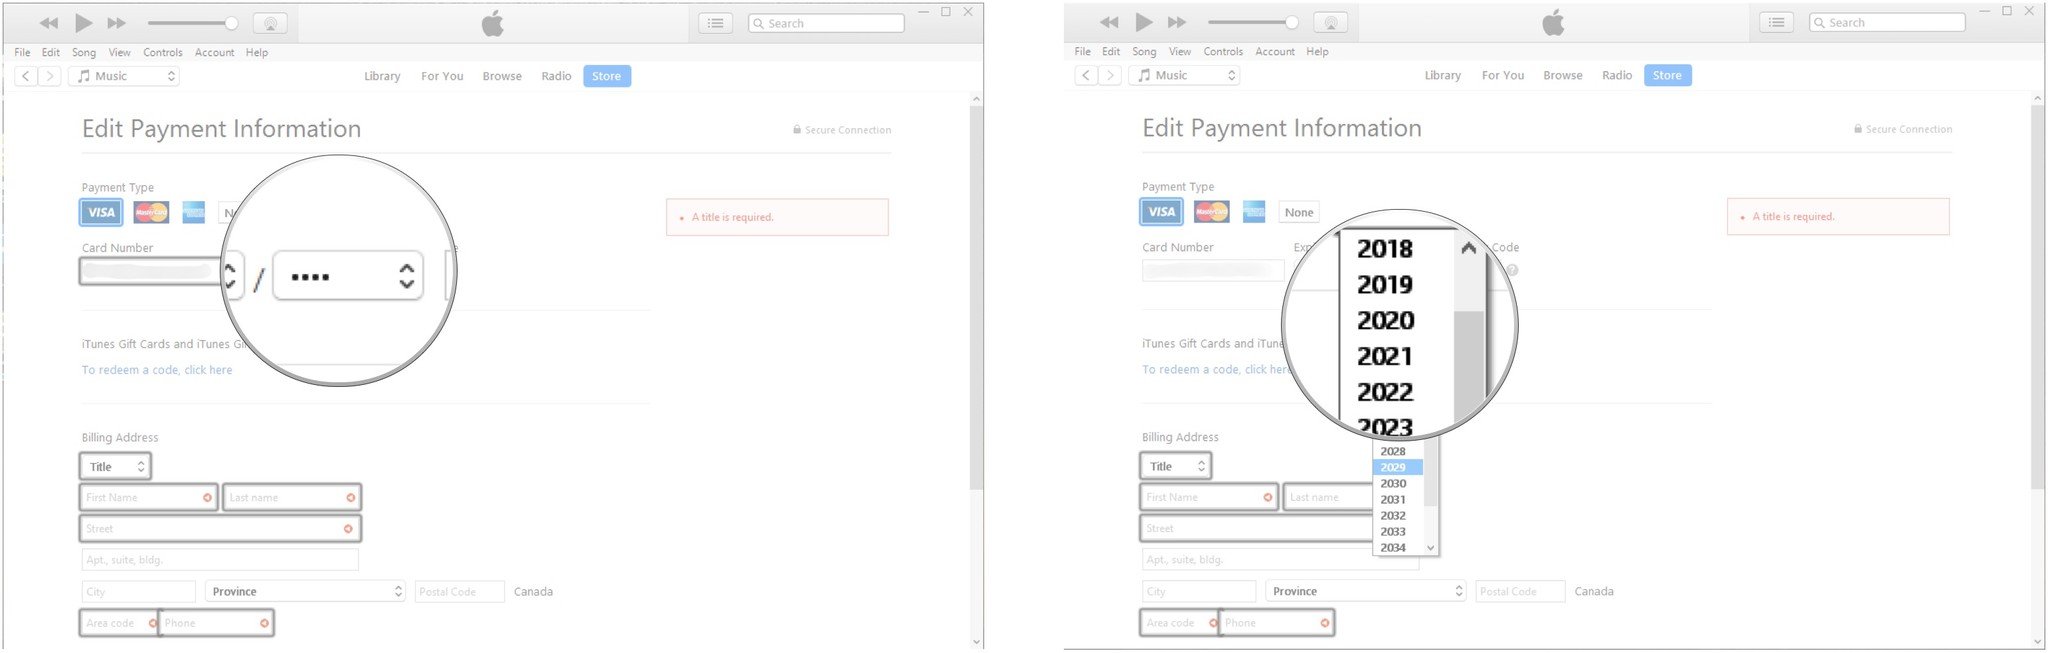
- Click the dropdown arrow next to .....
-
Click the expiry year.
- Type your security code.
-
Click the dropdown arrow adjacent to Championship.
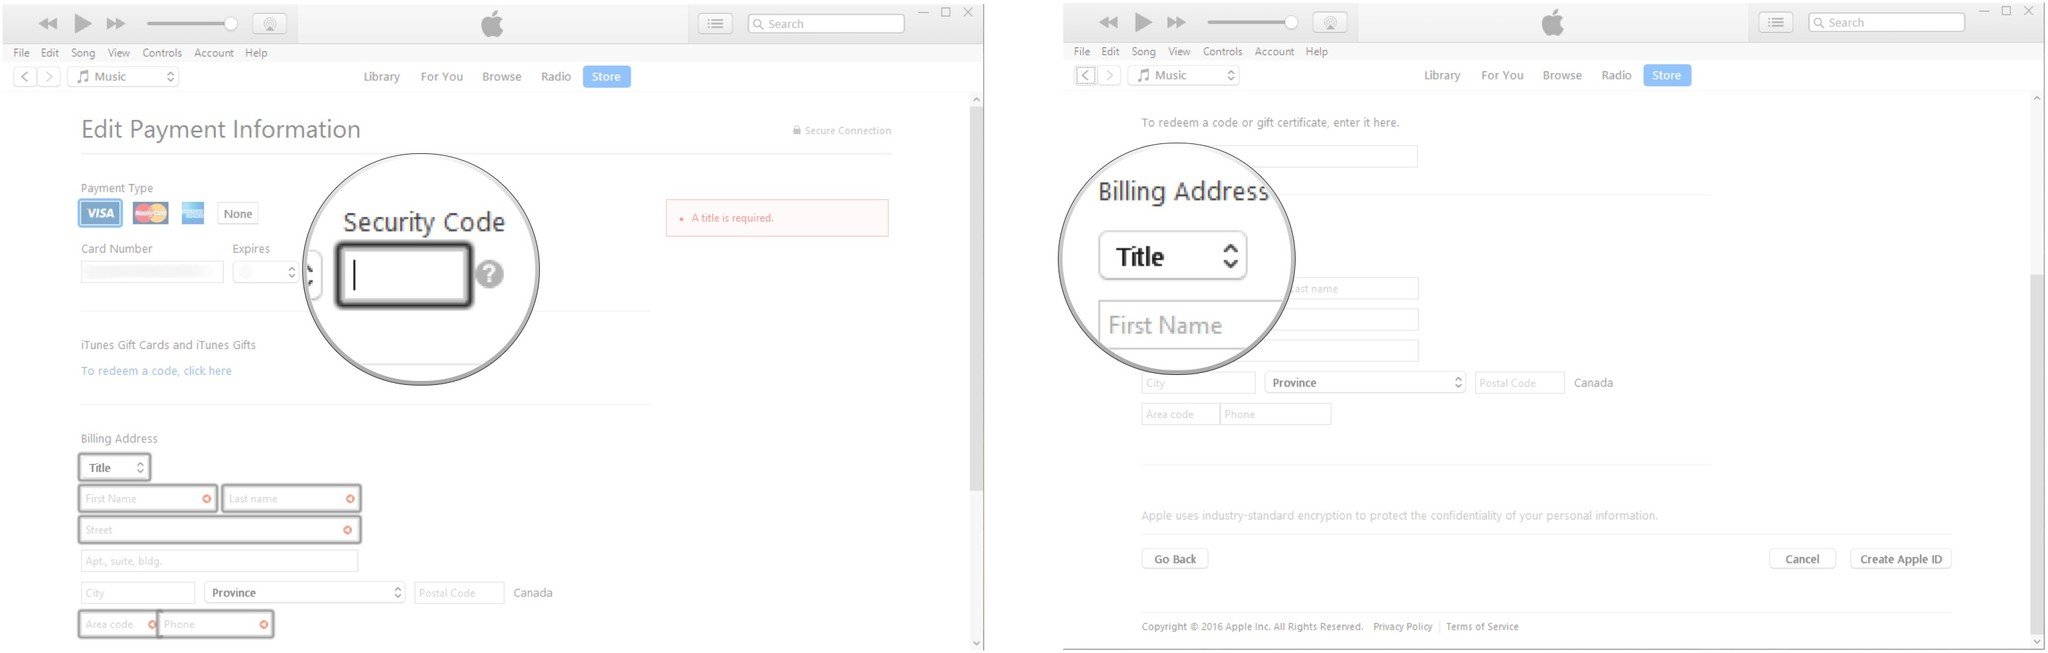
- Click a title.
-
Type your first name.
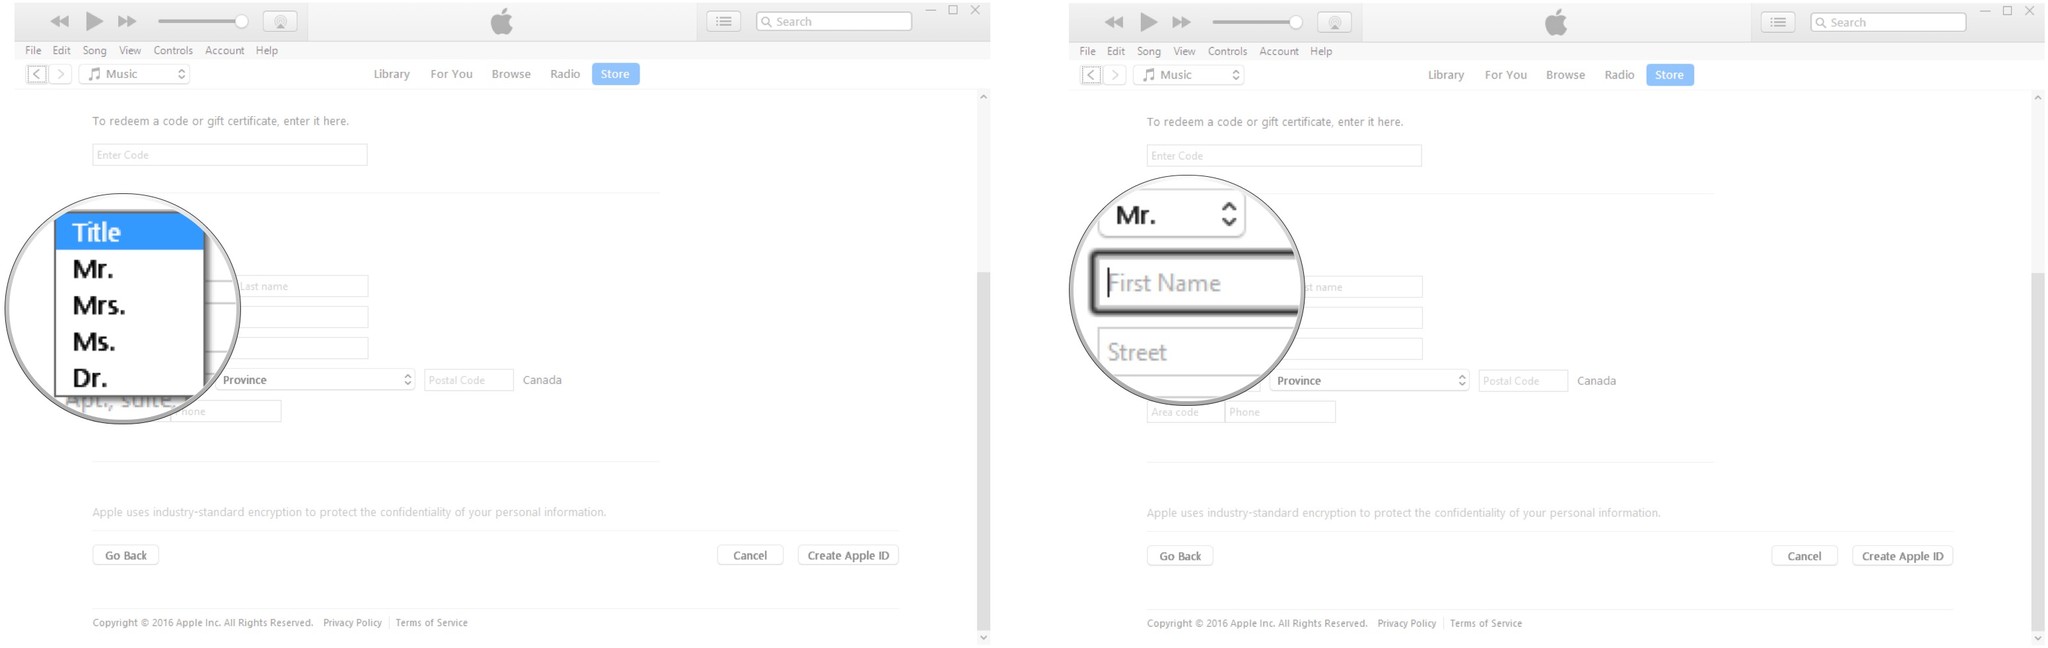
- Type your last proper noun.
-
Blazon your address.
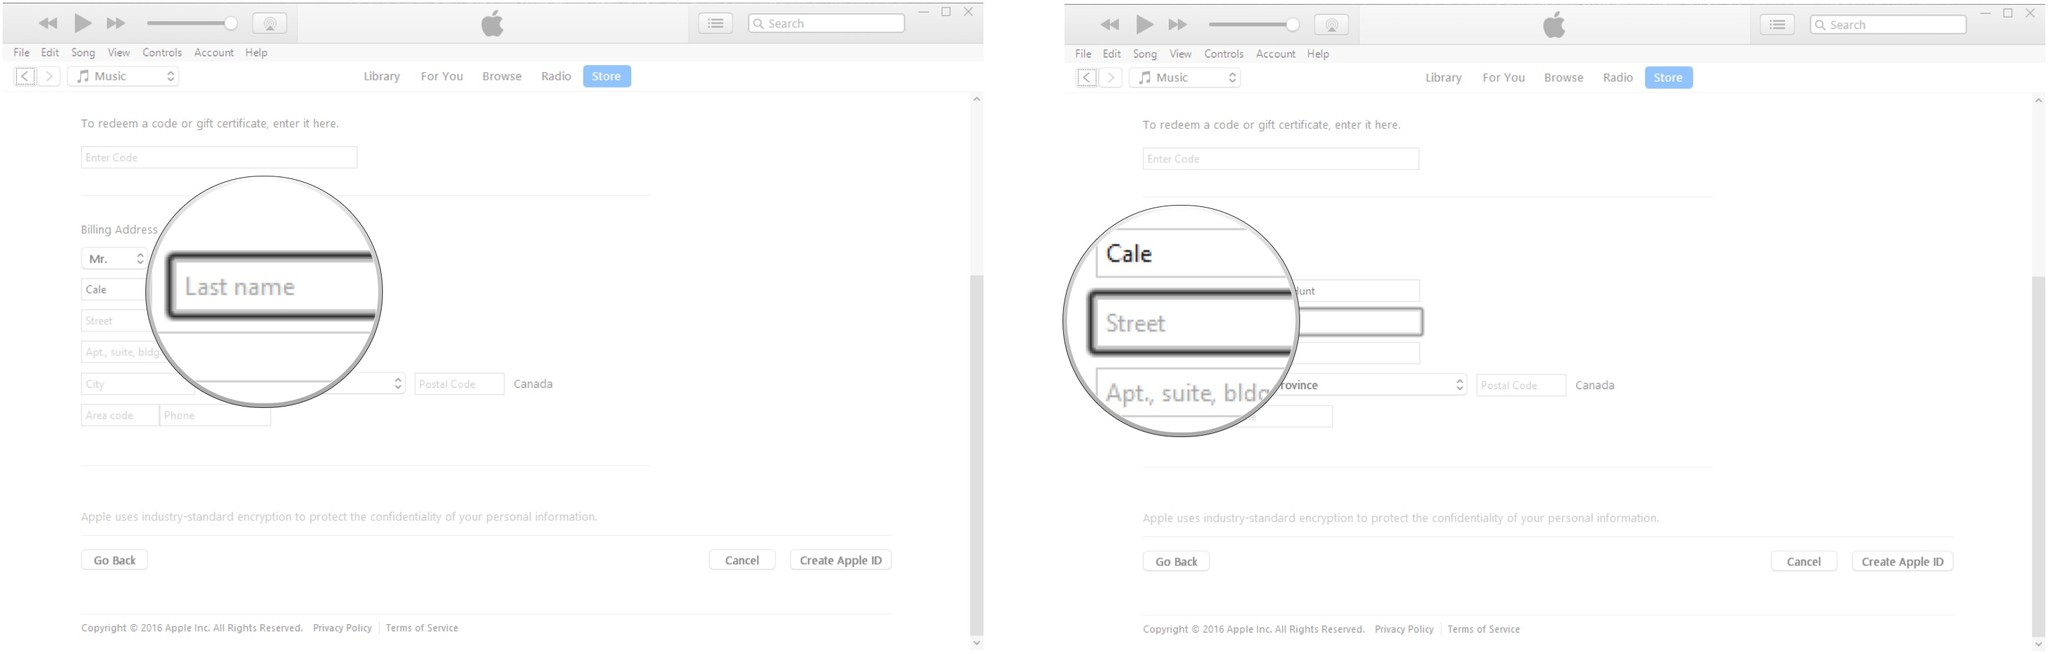
- Type your urban center.
-
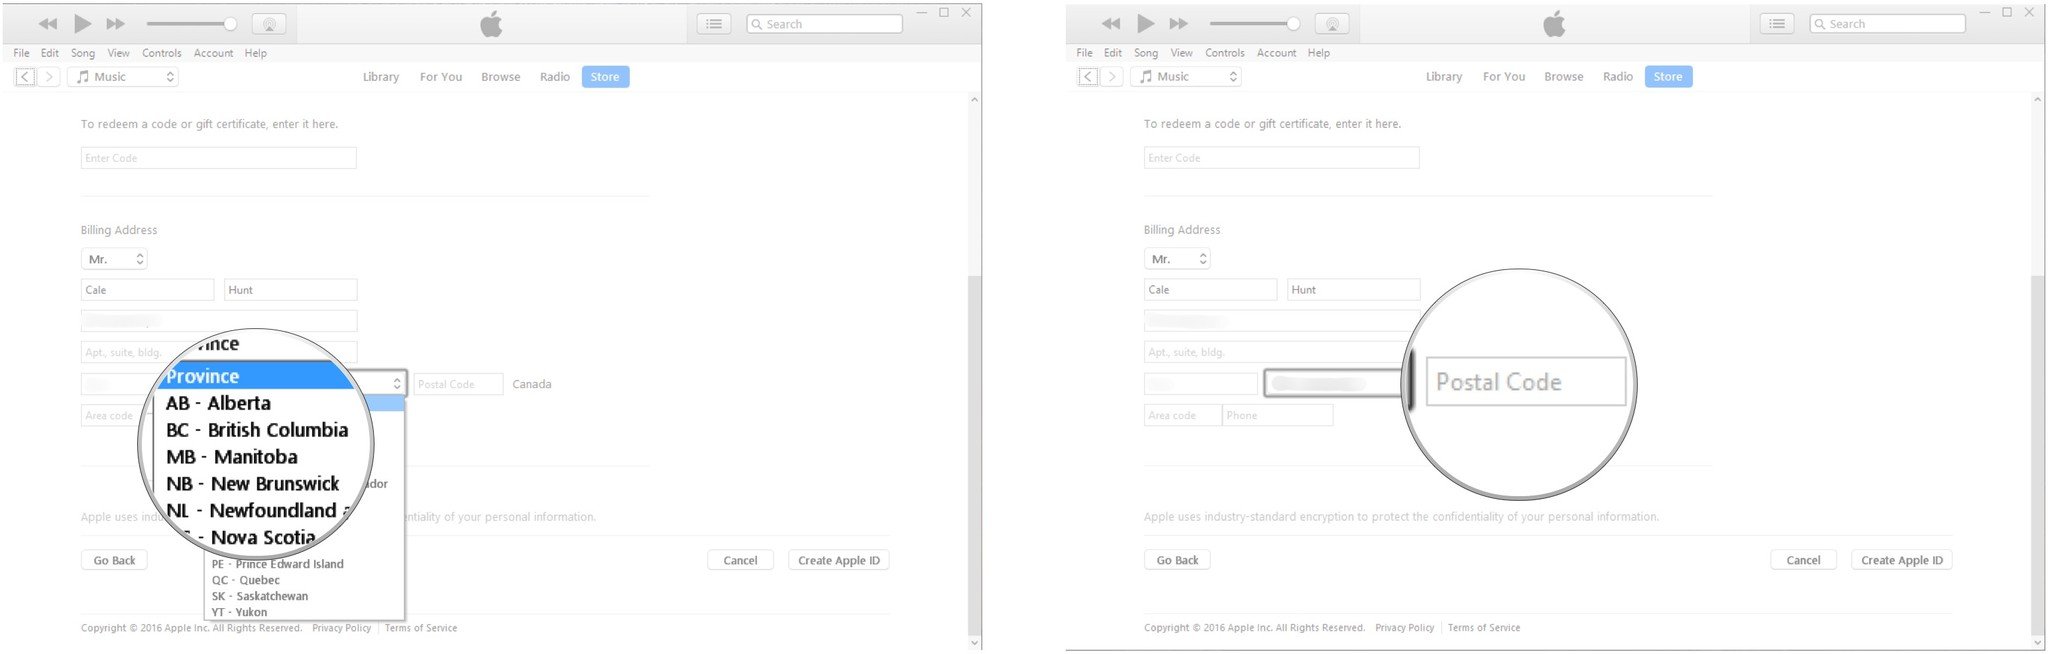
Click the dropdown arrow next to Province/State.

- Click your province or state.
-
Blazon your postal lawmaking.
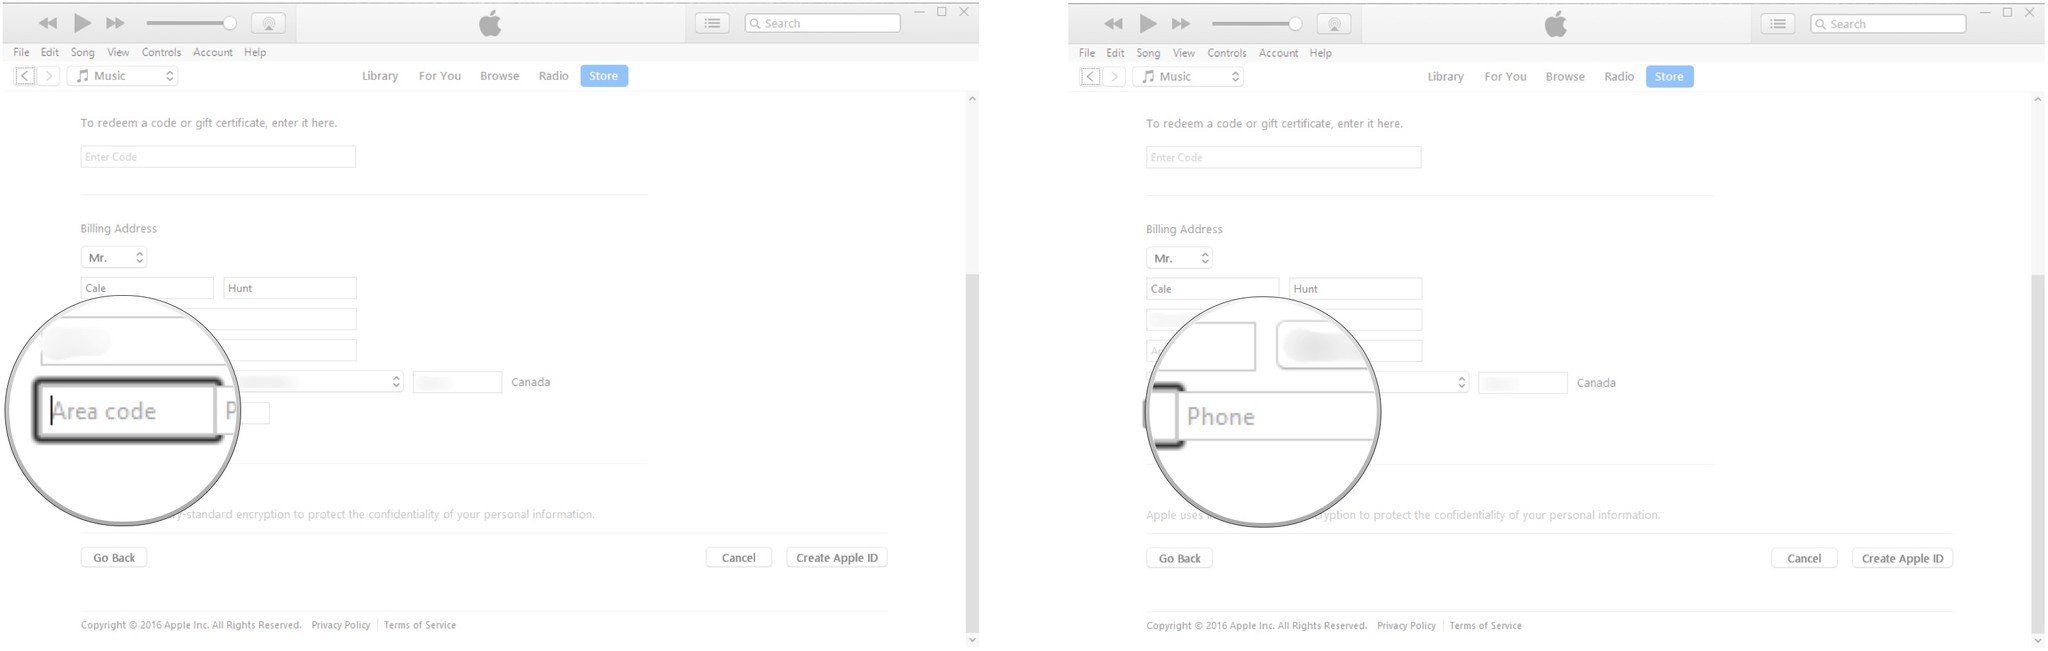
- Type your expanse code.
-
Type your phone number.
- Click Create Apple ID. An electronic mail containing a verification link volition be sent to the email address you lot used for your Apple ID.
-
Click OK once yous've verified your e-mail.


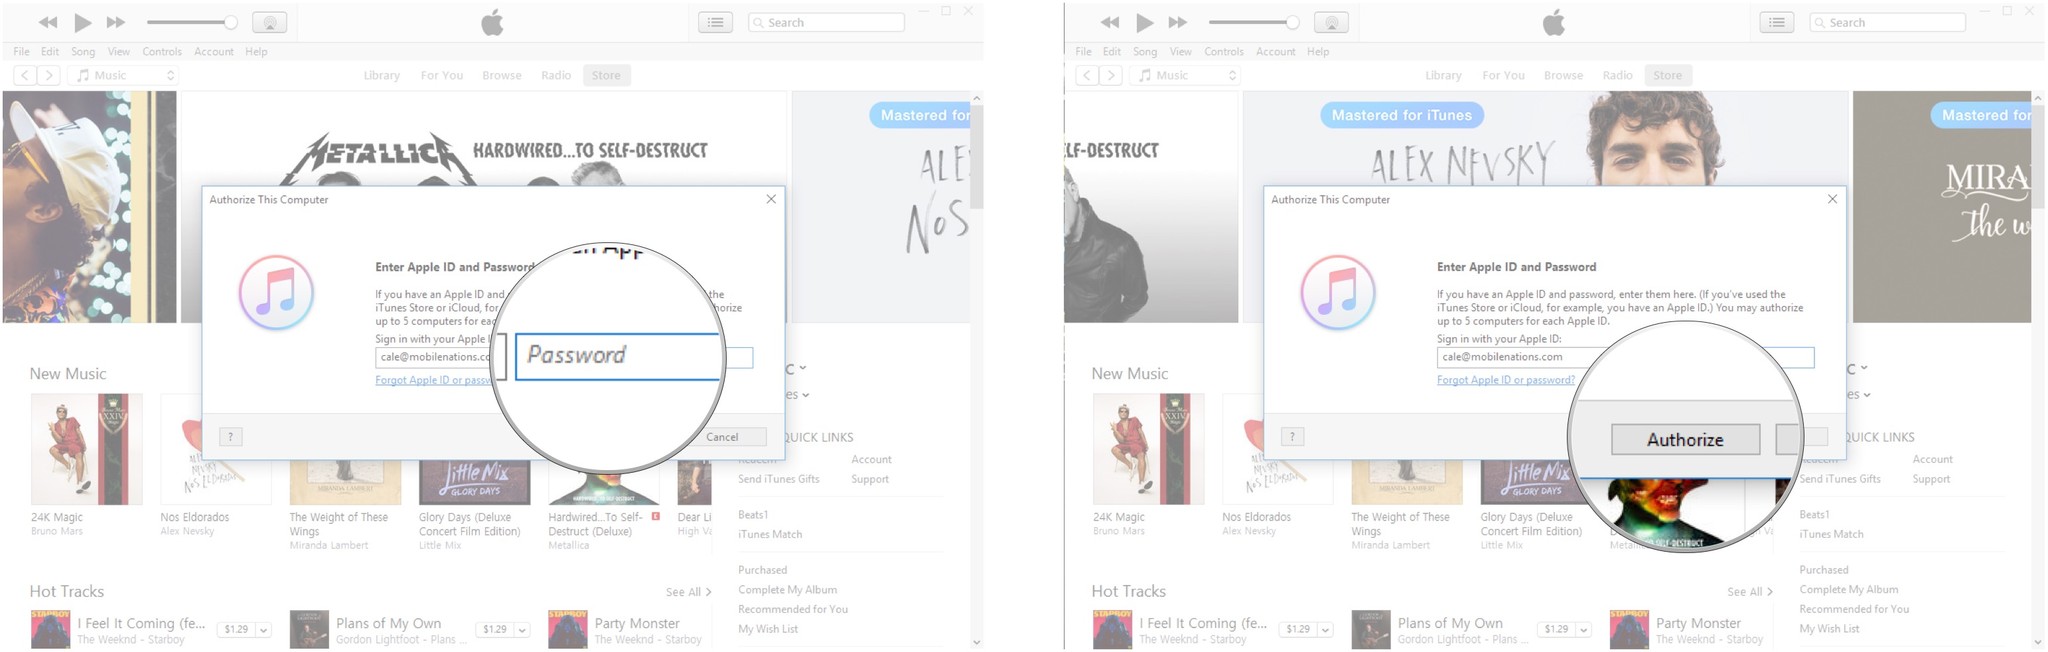
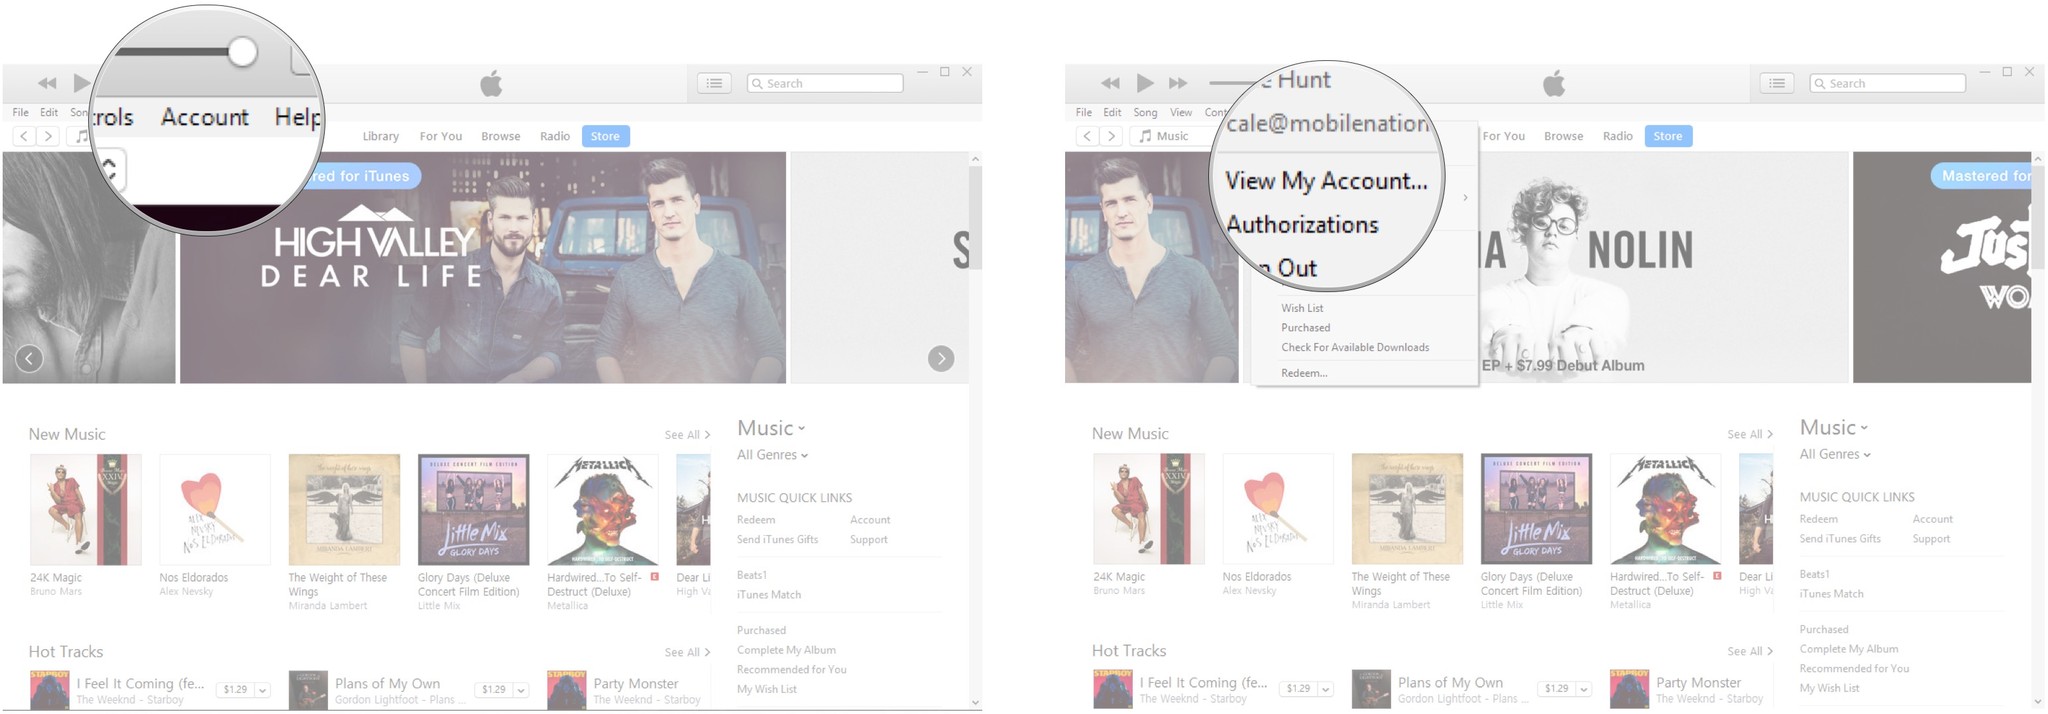
How to authorize your computer in iTunes on Windows 10
Authorizing your computer in iTunes gives it permission to admission all your content. You can have up to five devices authorized in your proper name. Here's how to qualify your Windows x PC, and hither's how to deauthorize your Windows x PC.
- Launch iTunes from your Start menu, taskbar, or desktop.
-
Click Account from the carte most the top-left corner of the window.
- Click Authorizations.
-
Click Authorize This Computer.
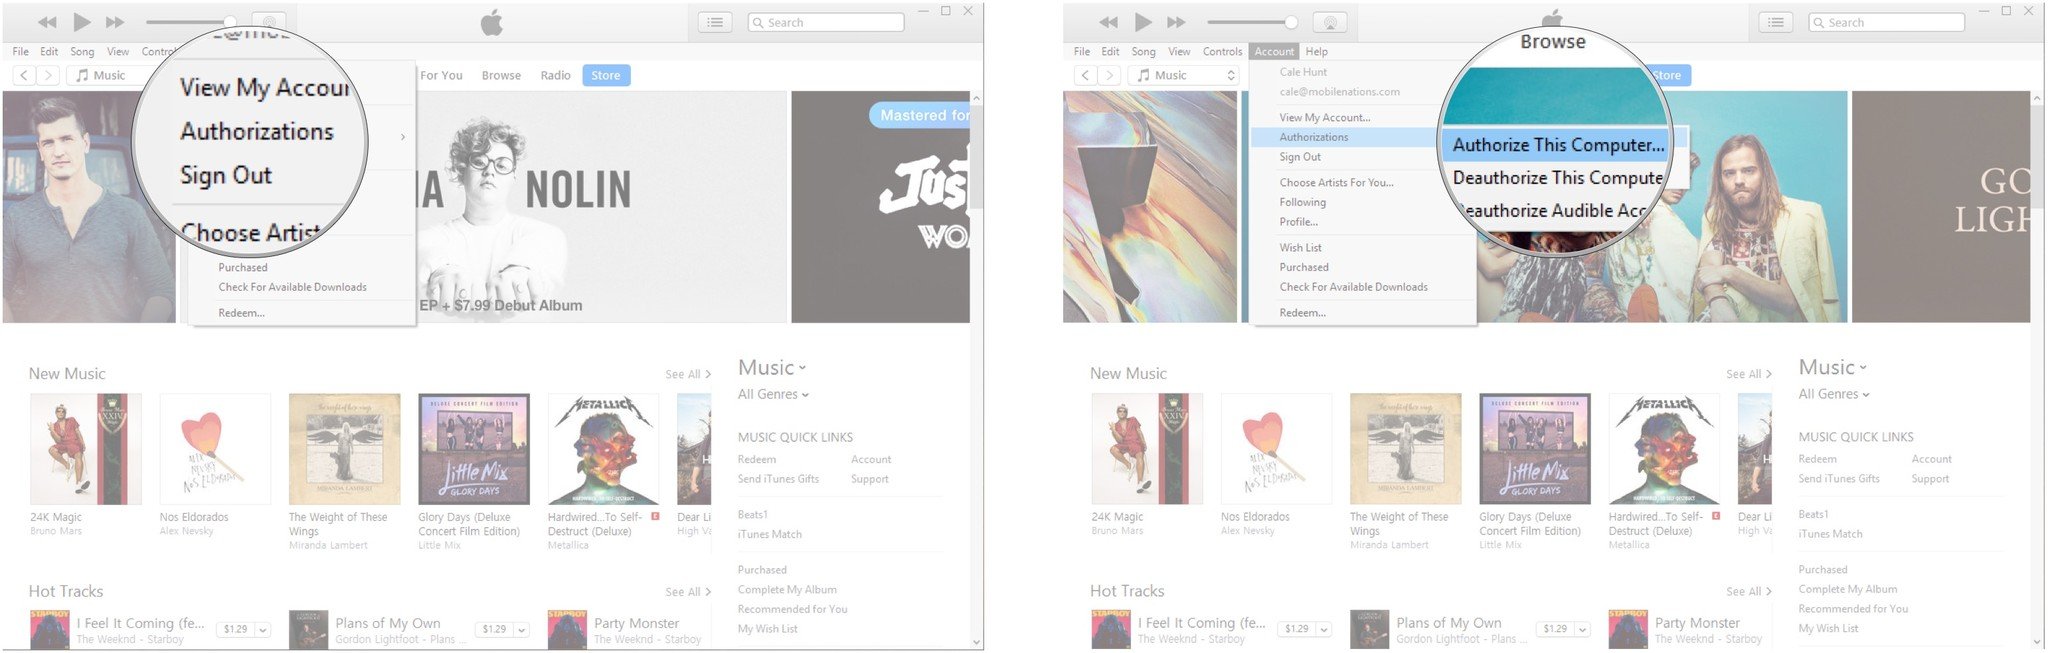
- Type your password.
-
Click Authorize.


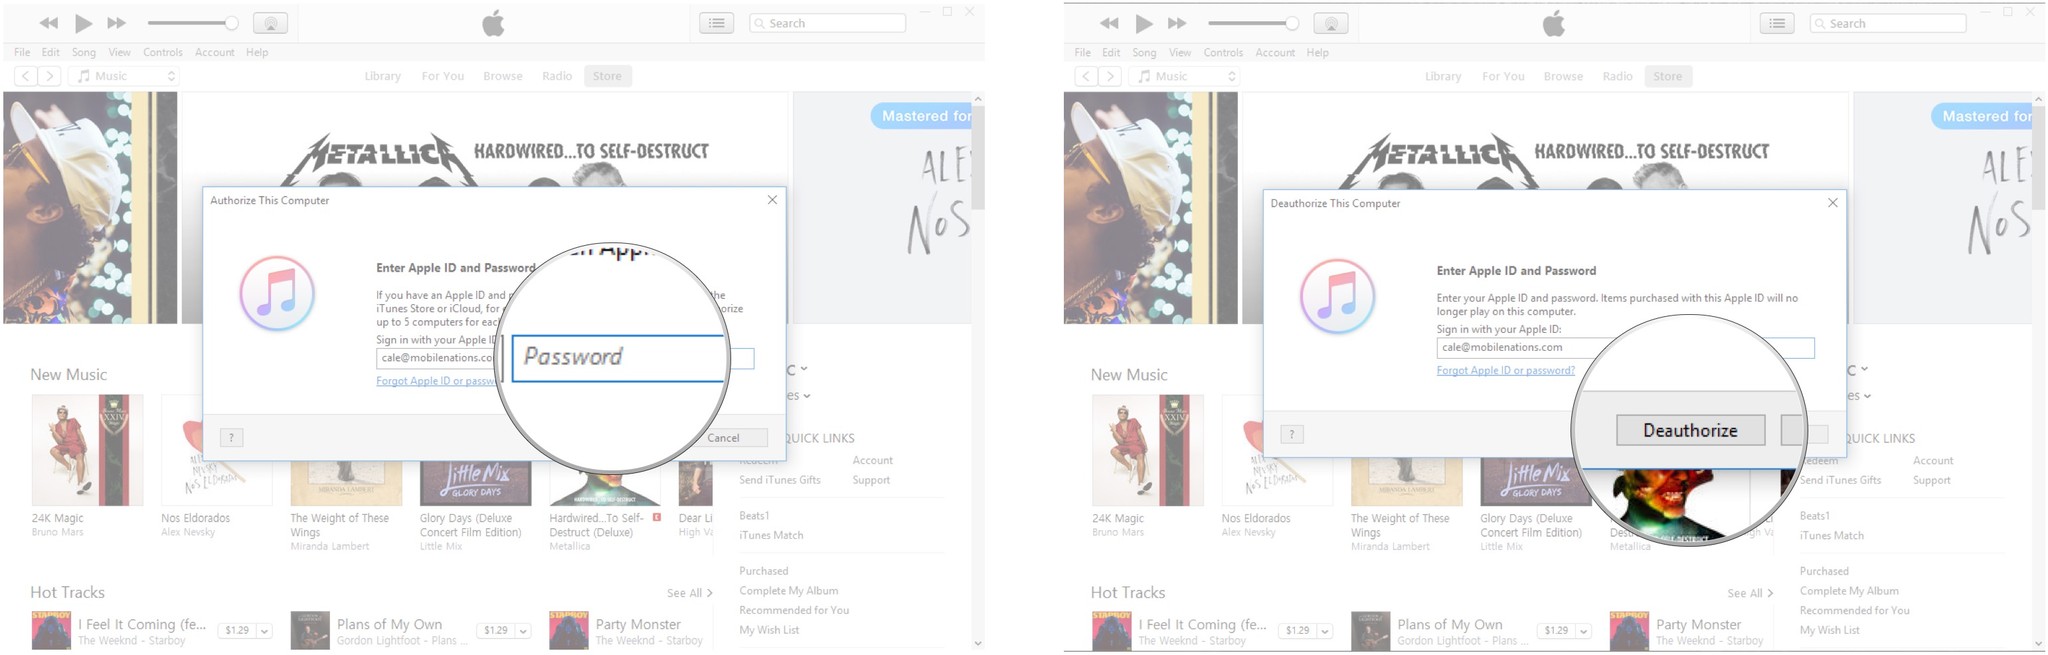
Your computer is at present authorized. Here's how to deauthorize.
- Launch iTunes from your Kickoff bill of fare, taskbar, or desktop.
-
Click Account from the carte near the top-left corner of the window.
- Click Authorizations.
-
Click Deauthorize This Computer.

- Blazon your password.
-
Click Deauthorize.


How to import your media library into iTunes on Windows 10
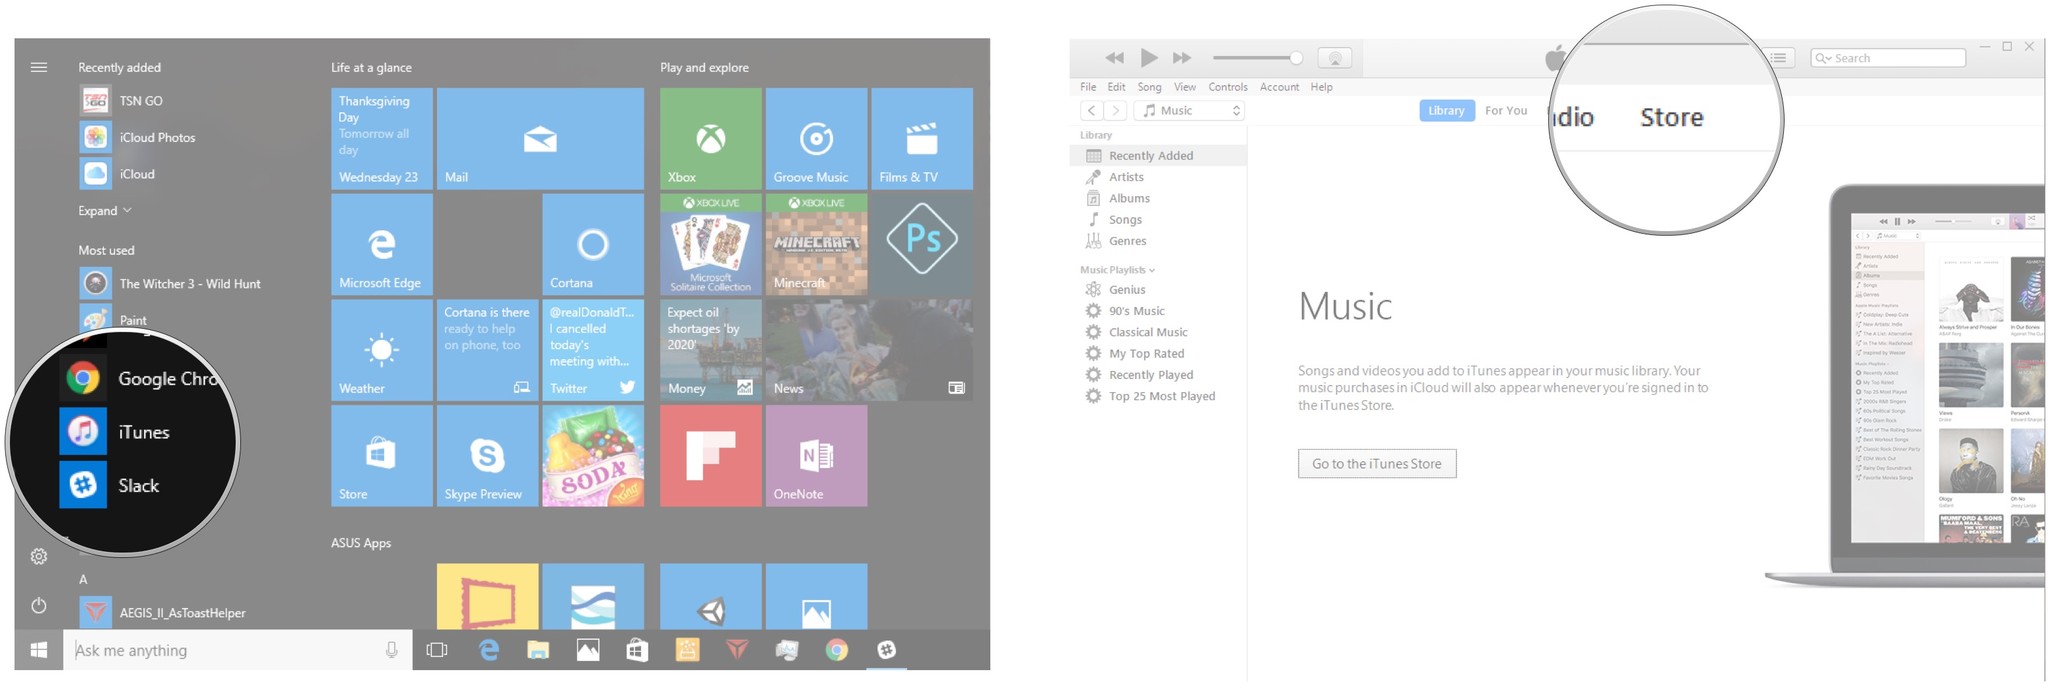
- Launch iTunes from your Start menu, taskbar, or desktop.
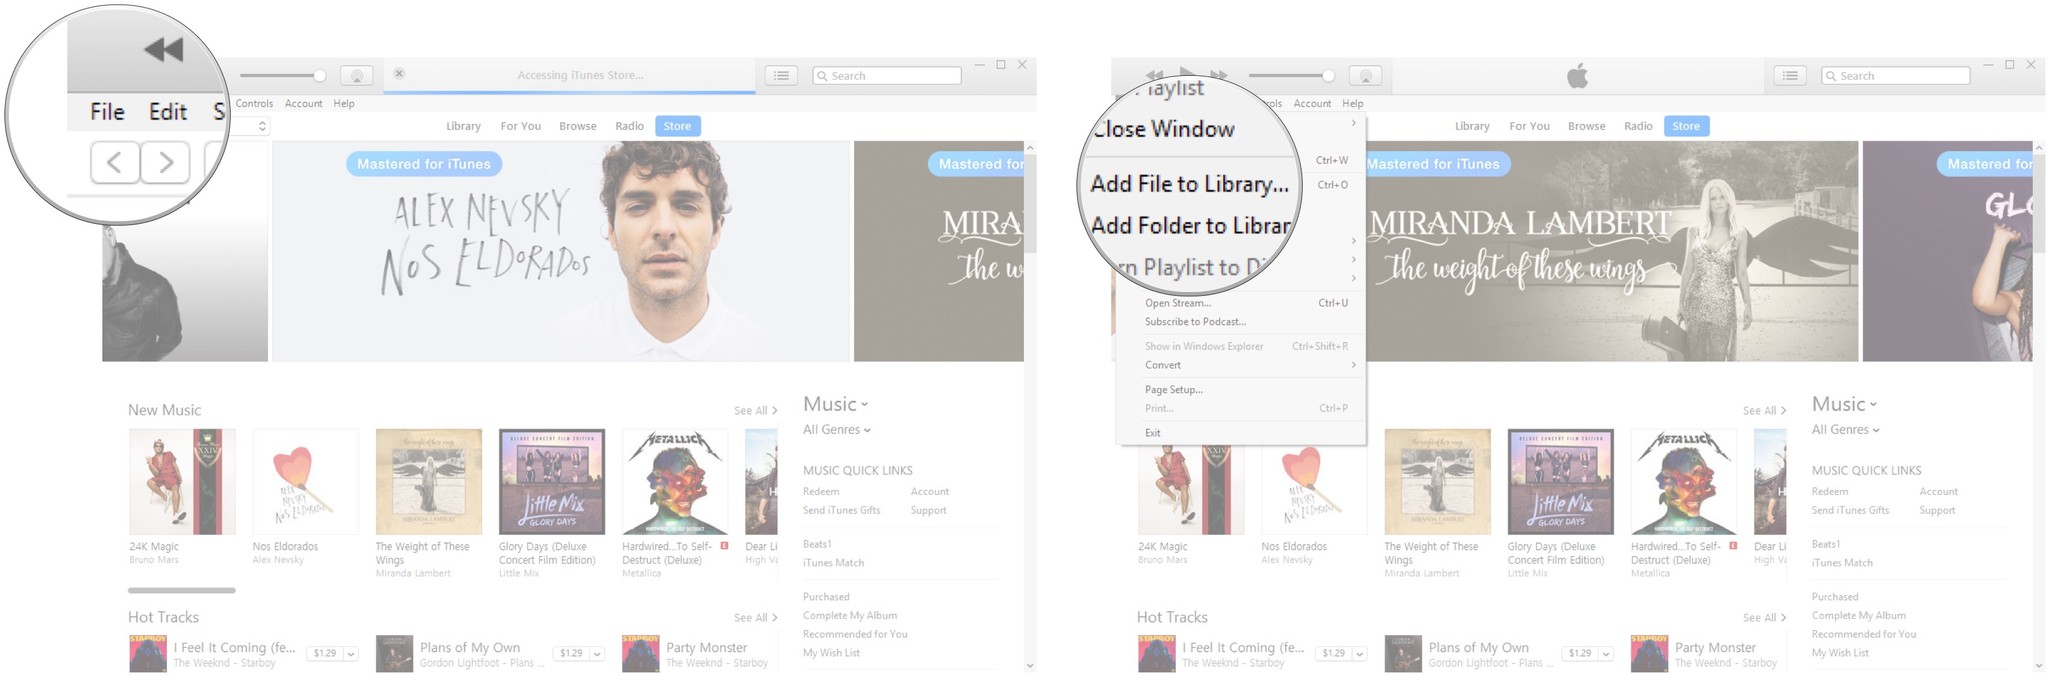
- Click File.
-
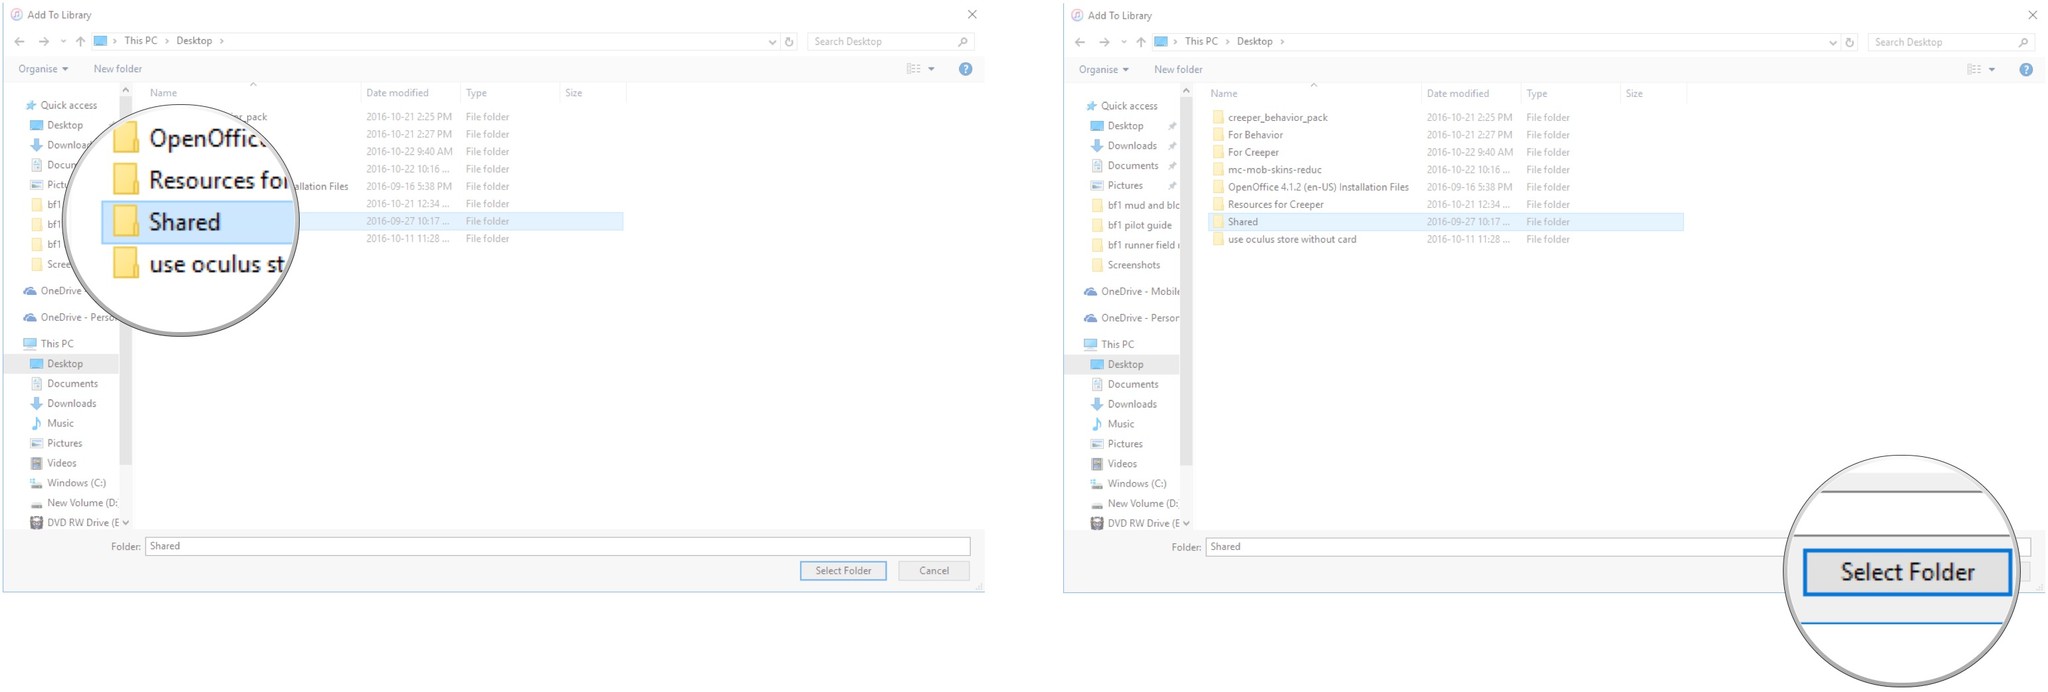
Click Add Binder to Library.
- Click a file or binder you'd like to import into iTunes.
-
Click Select Folder.


This process can be repeated until all of your files are in iTunes.
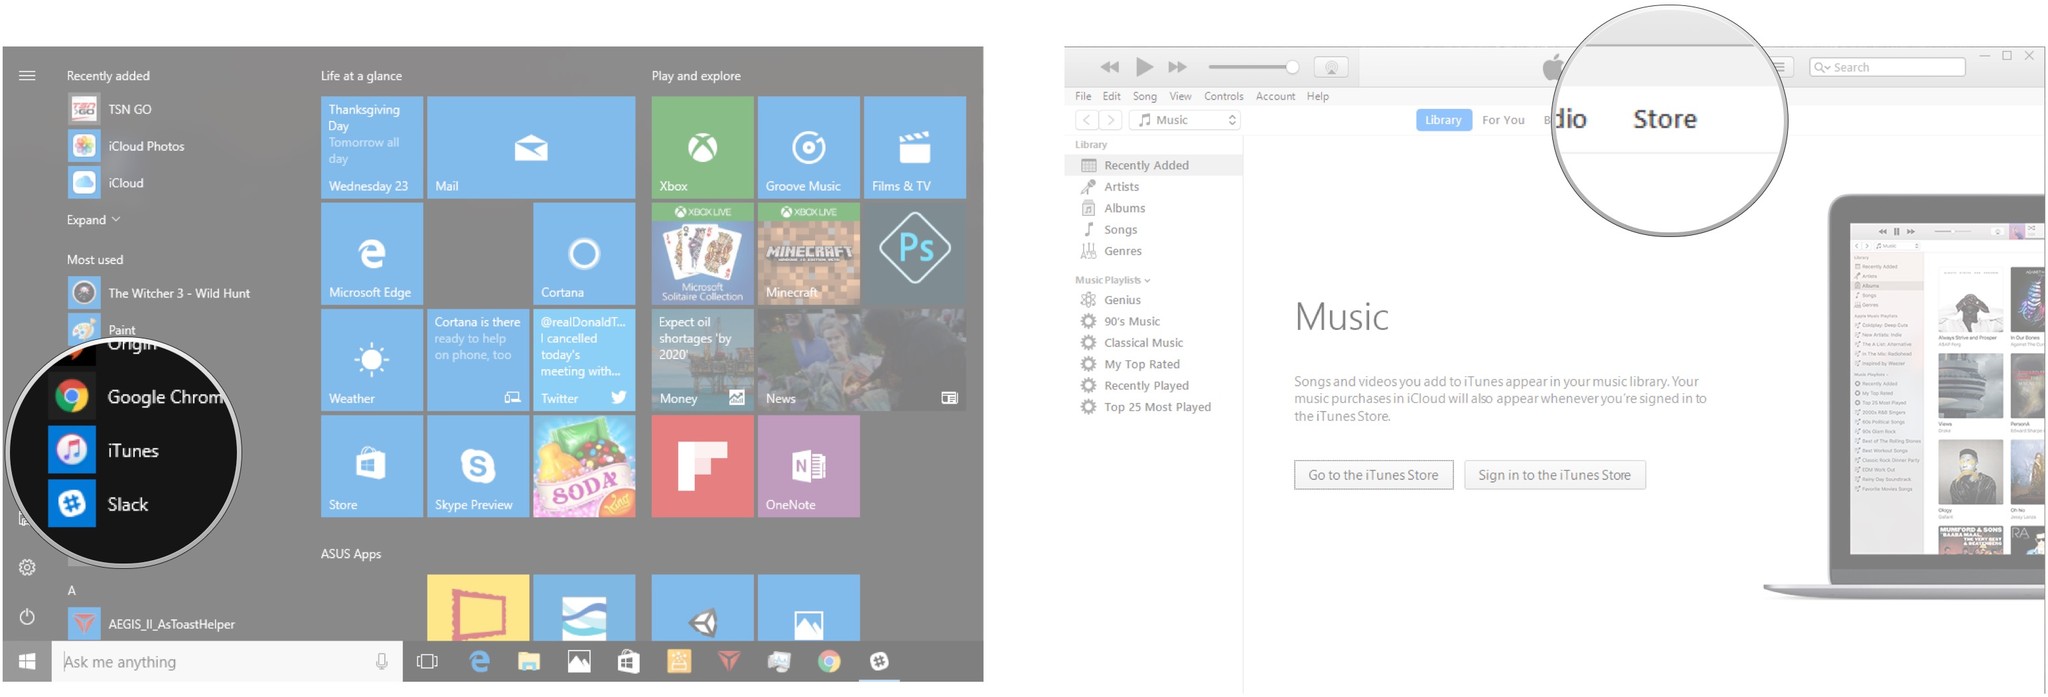
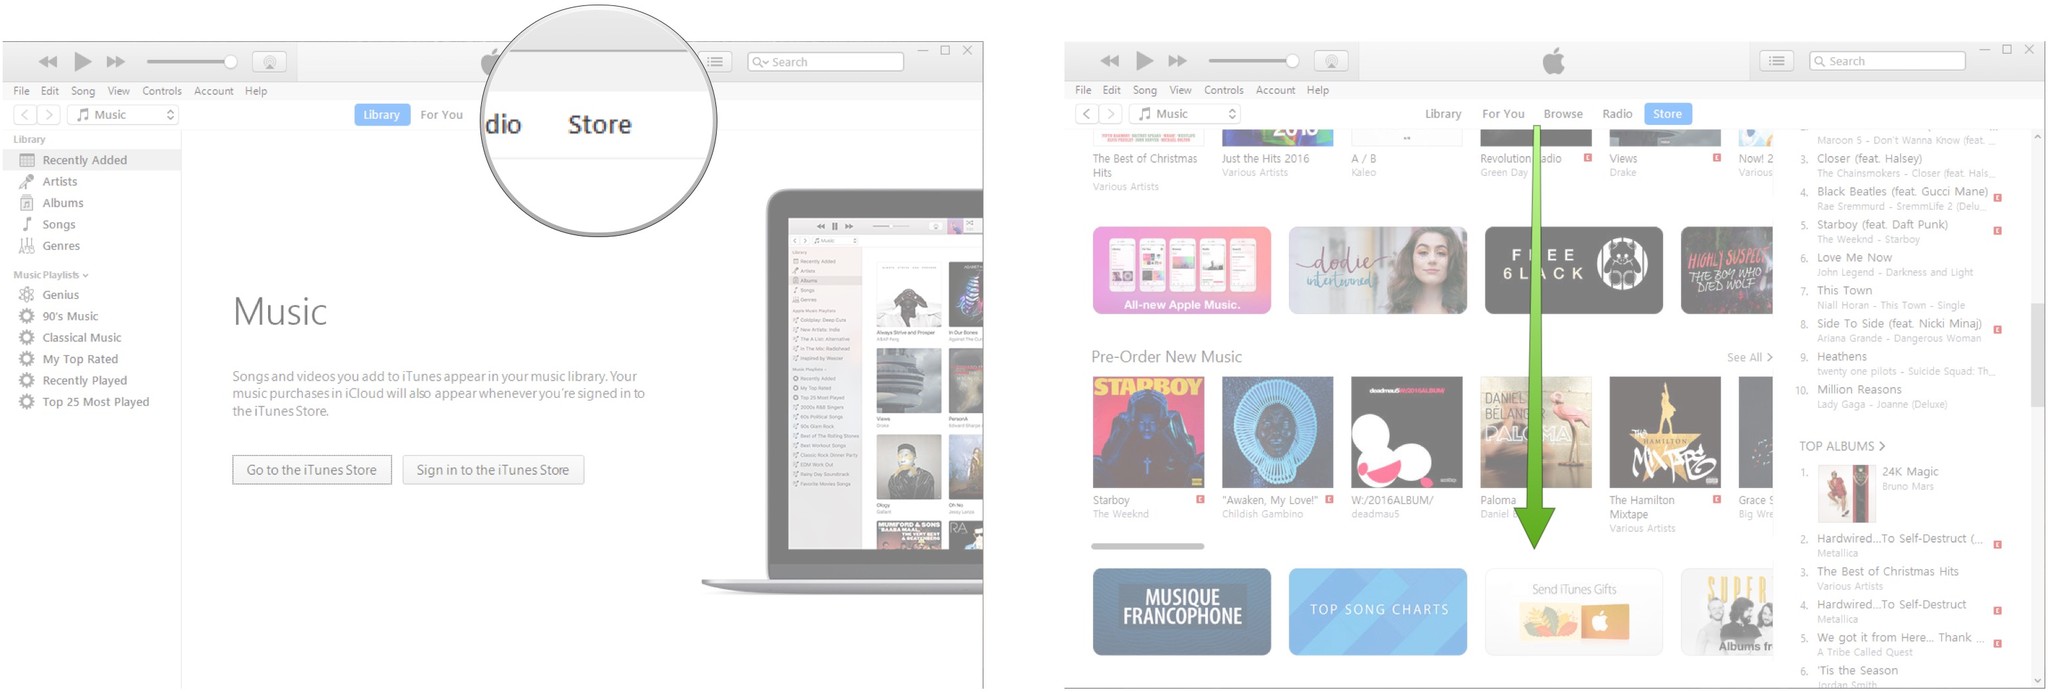
How to buy content from iTunes on Windows 10
The iTunes store has a ton of media available for purchase and download. Here's how to get started.
- Launch iTunes from your desktop, Start menu, or taskbar.
-
Click Store from the carte du jour near the summit of the window.
- Click the price next to an item you'd similar to buy.
-
Blazon your countersign.
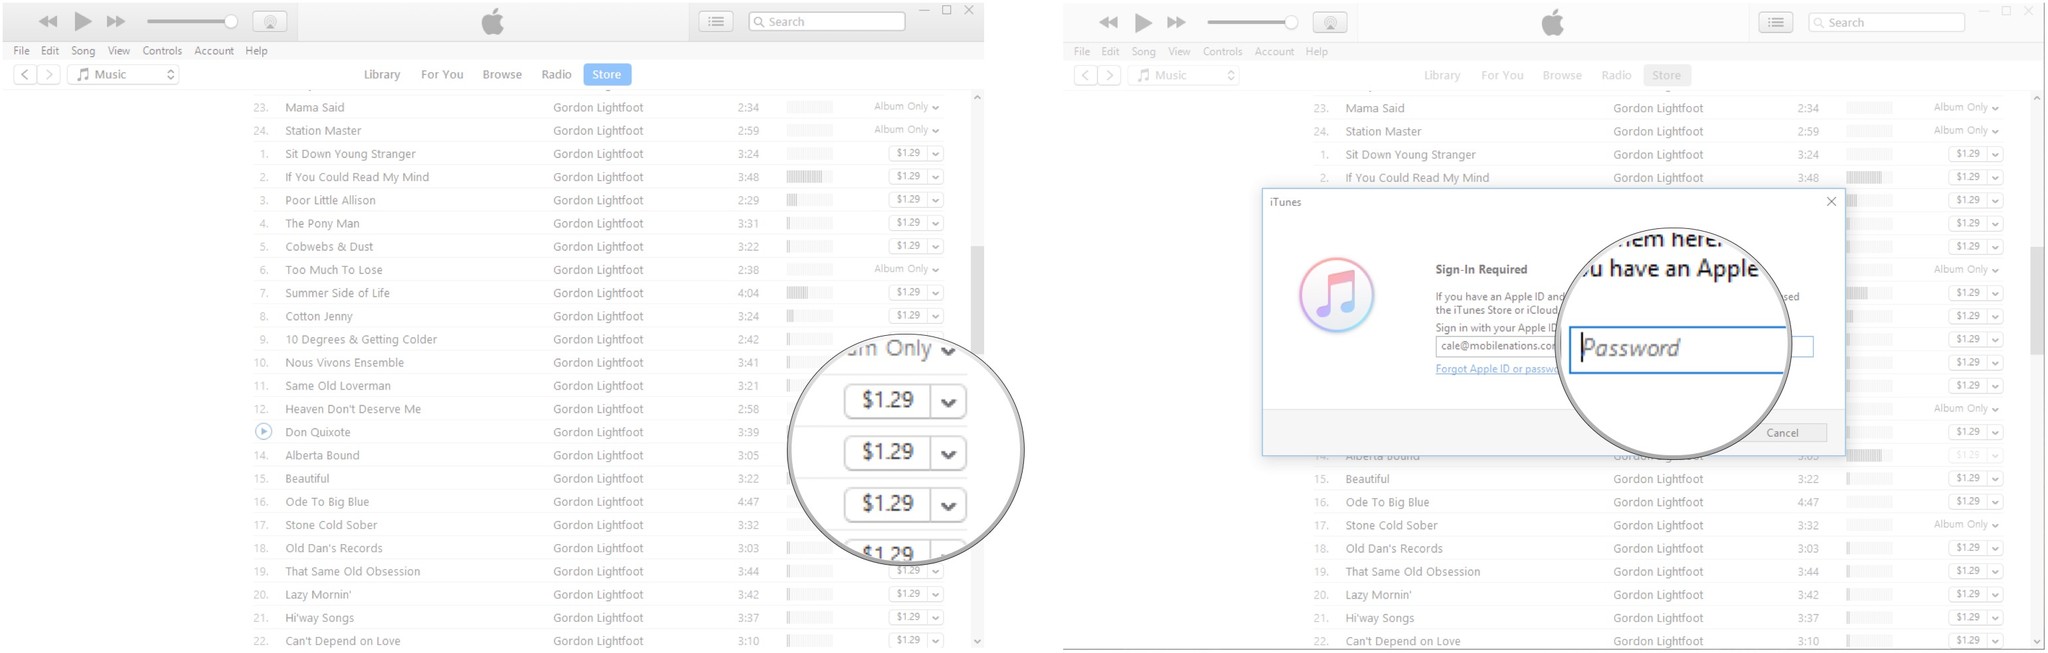
- Click Purchase.
-
Click Buy.
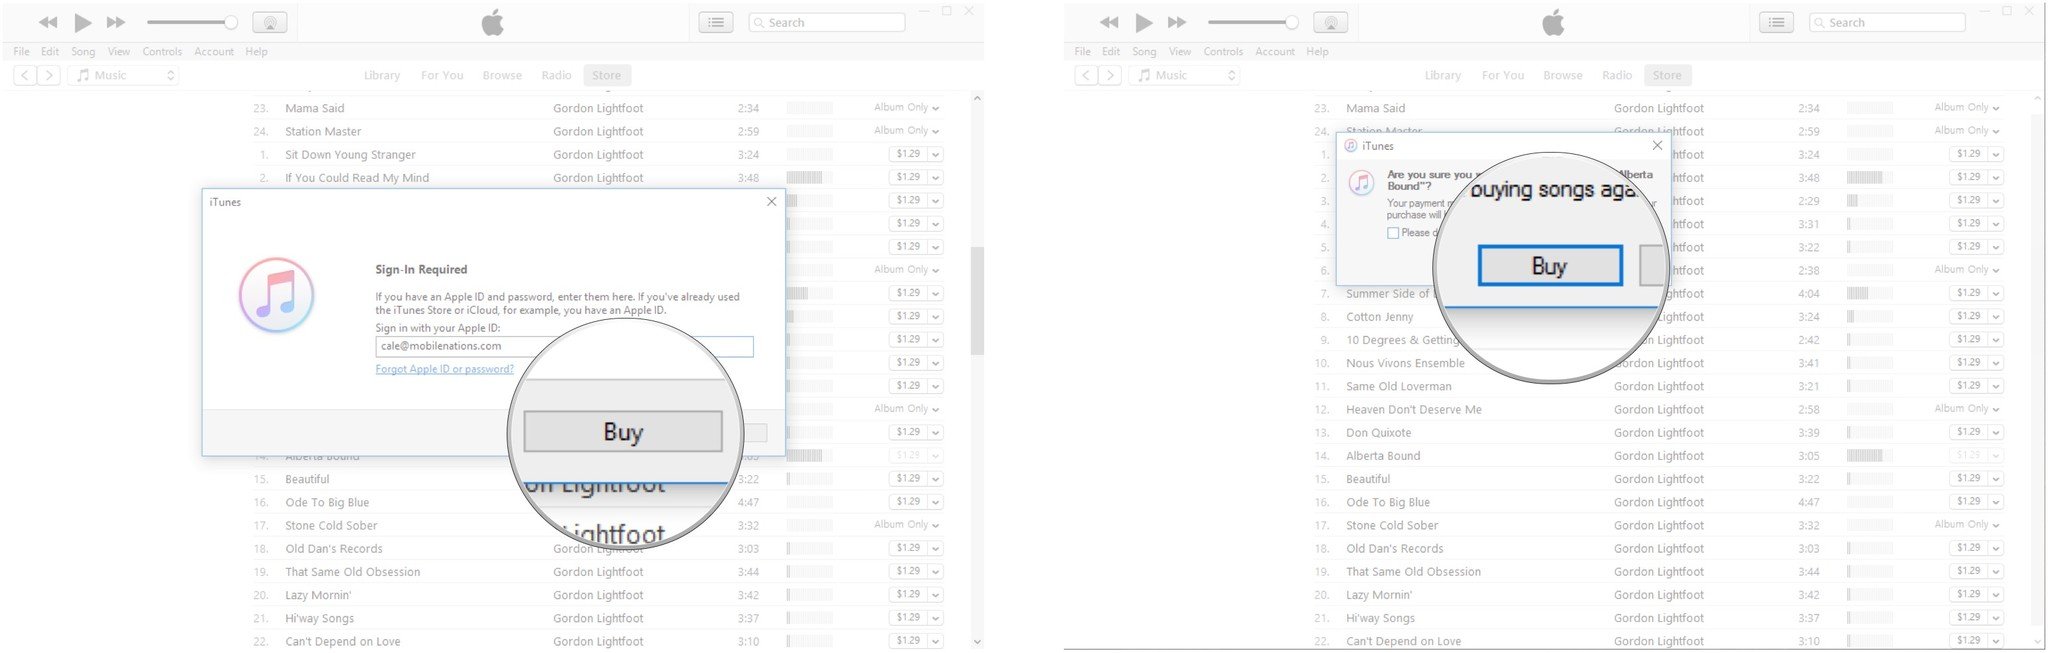


The item will begin to download and can be found in your Library when completed.
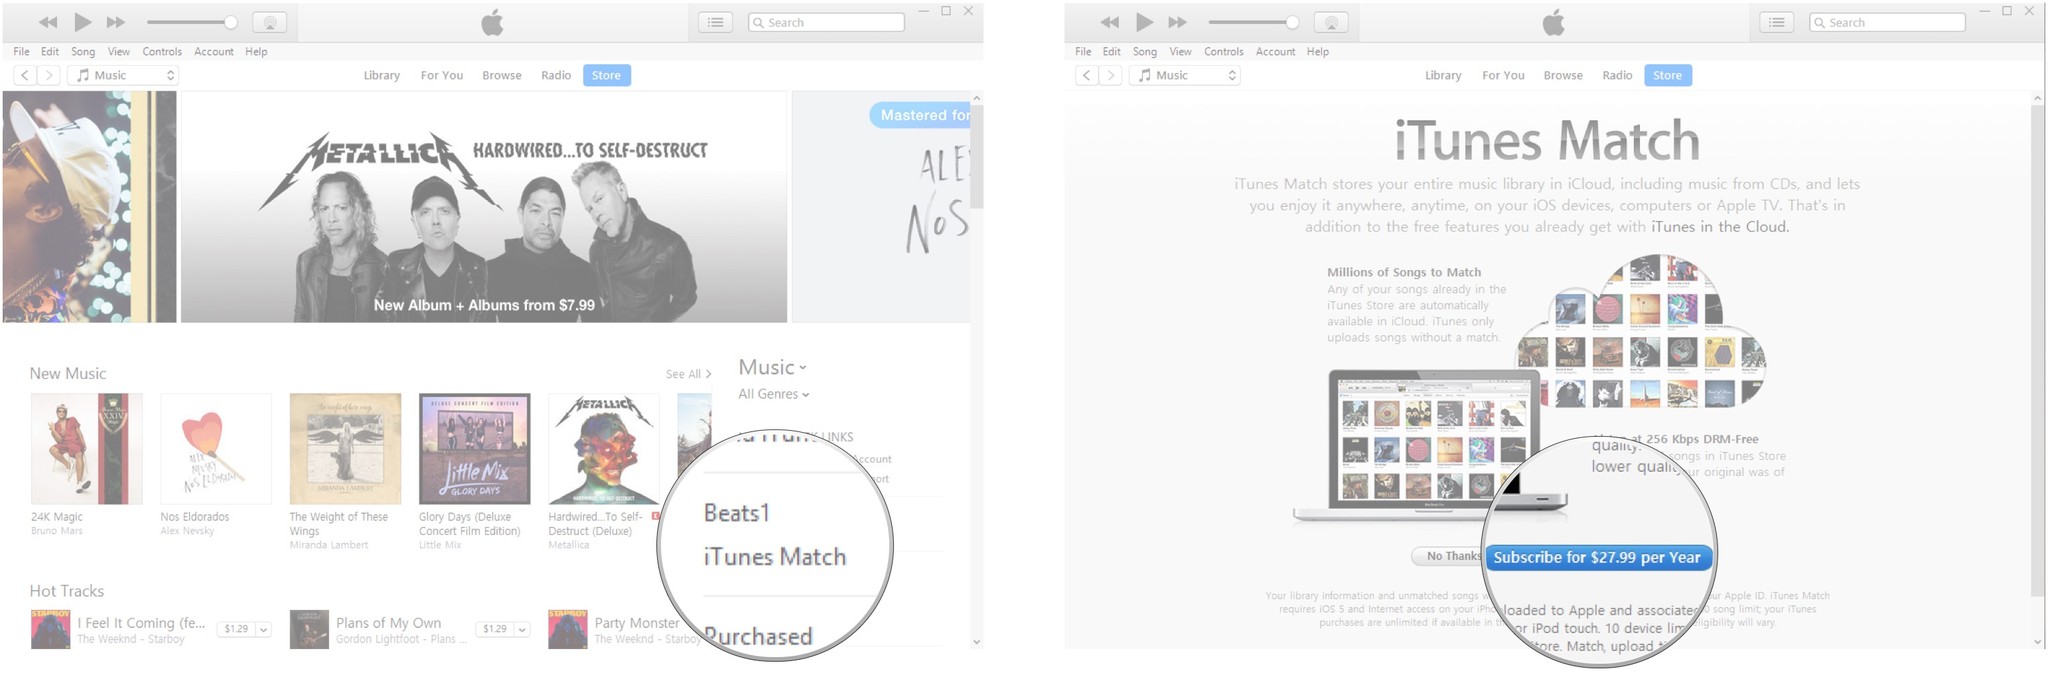
How to subscribe to iTunes Match on Windows x
iTunes Match backs upwards your entire music drove in the cloud for admission anywhere. Information technology volition scan your library and provide access to Apple's cloud-stored tunes, and if at that place's no match between your track and theirs, Apple volition upload your music for remote access on iPhone, iPad, or other computers. Here'south how to get started with information technology.
- Launch iTunes from your desktop, Start menu, or taskbar.
-
Click Store from the menu almost the summit of the window.
- Click iTunes Match from the menu on the right side of the window.
-
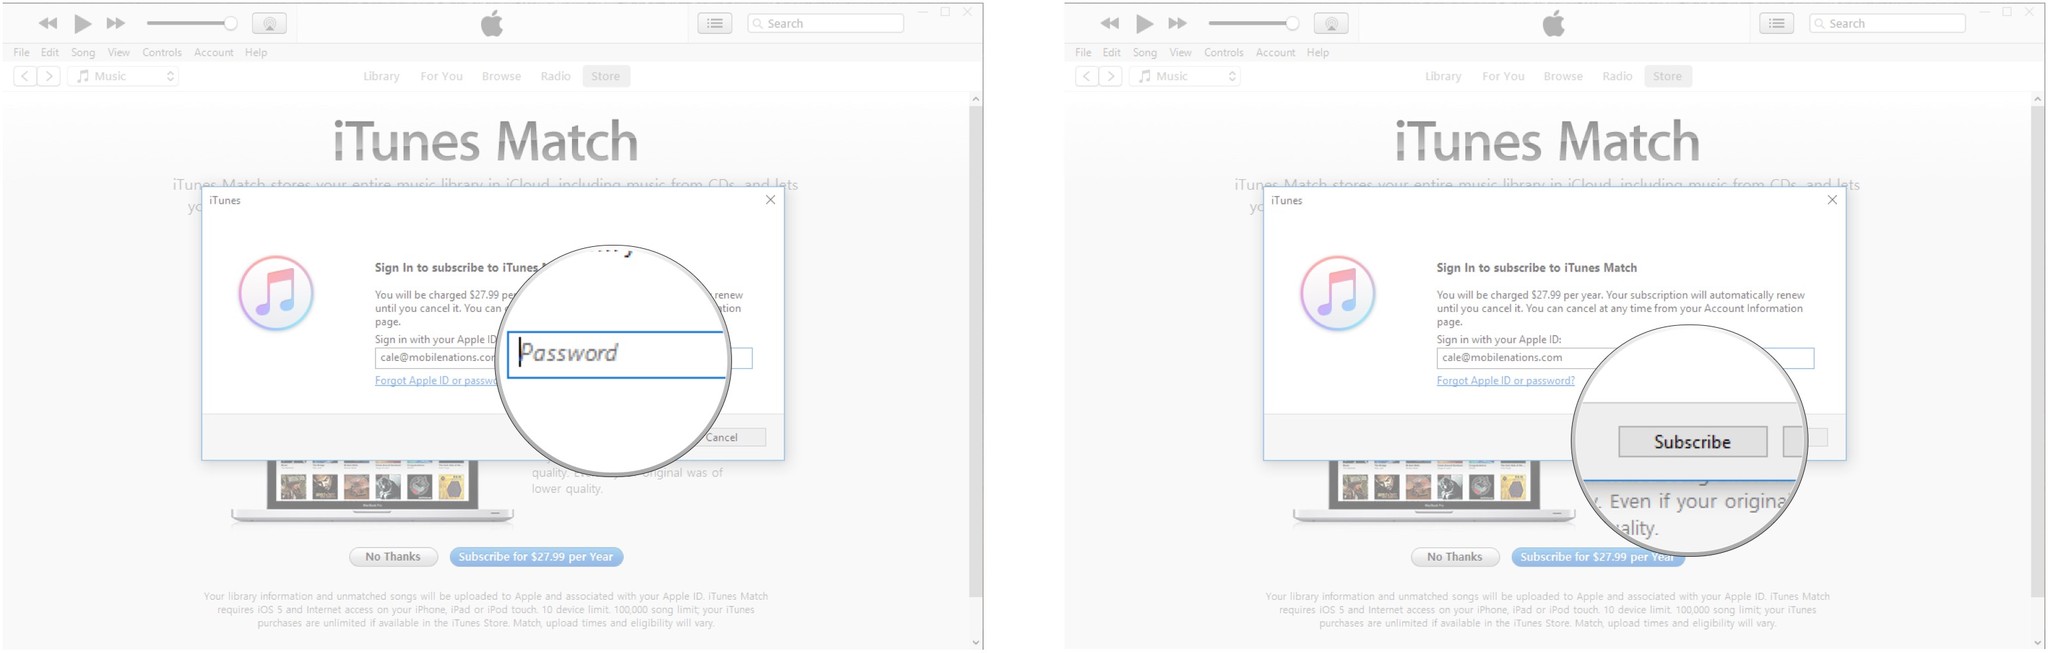
Click Subscribe for $XX.Xx per yr.
- Blazon your password.
-
Click Subscribe.


Hither's how to cancel your iTunes Lucifer subscription to stop information technology from auto-renewing each month.
- Launch iTunes from your desktop, Start menu, or taskbar.
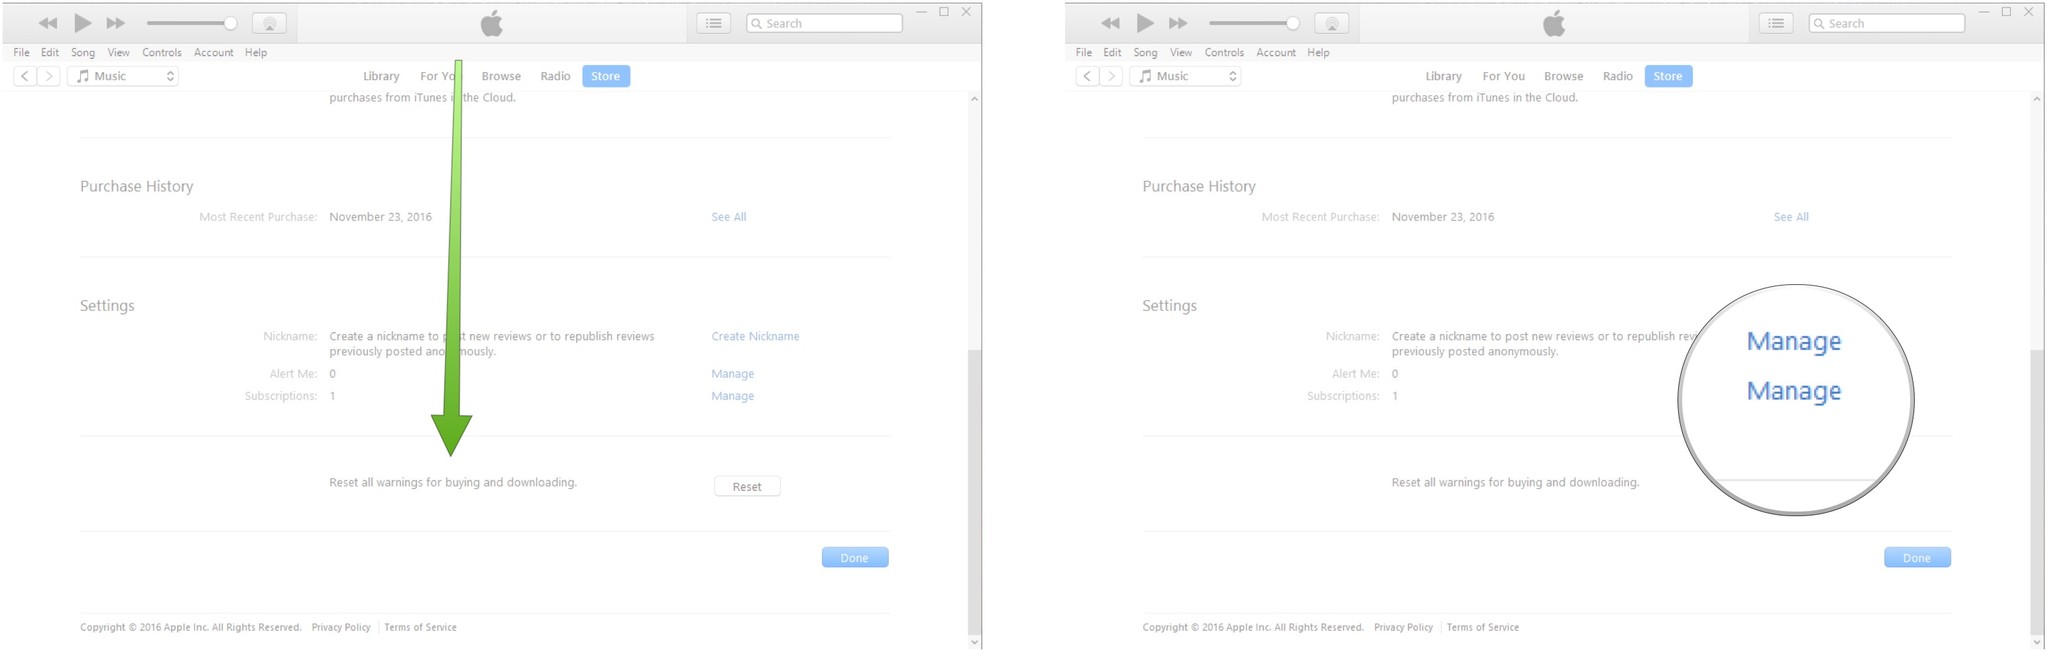
- Click Business relationship from the menu almost the top-left corner of the window.
-
Click View My Account.
- Scroll downward to the Settings row.
-
Click Manage next to Subscriptions.
- Click Cancel Subscription beneath iTunes Match.
- Click Confirm.


For more helpful info on iTunes Match, check out our ultimate guide to your iCloud music library.
How to subscribe to Apple Music on Windows 10
Apple Music is more similar a traditional subscription service rather than a cloud content locker. With it, yous can enjoy all of the music from the expansive iTunes catalog on-need, so long as you're willing to fork over a monthly subscription fee. Here's how you lot get started using information technology.
- Launch iTunes from your desktop, Get-go carte du jour, or taskbar.
- Click Shop from the card near the tiptop of the window.
-
Scroll down to the bottom of the page.
- Click 3-Calendar month Trial below Apple Music.
-
Click Choose Your Program.
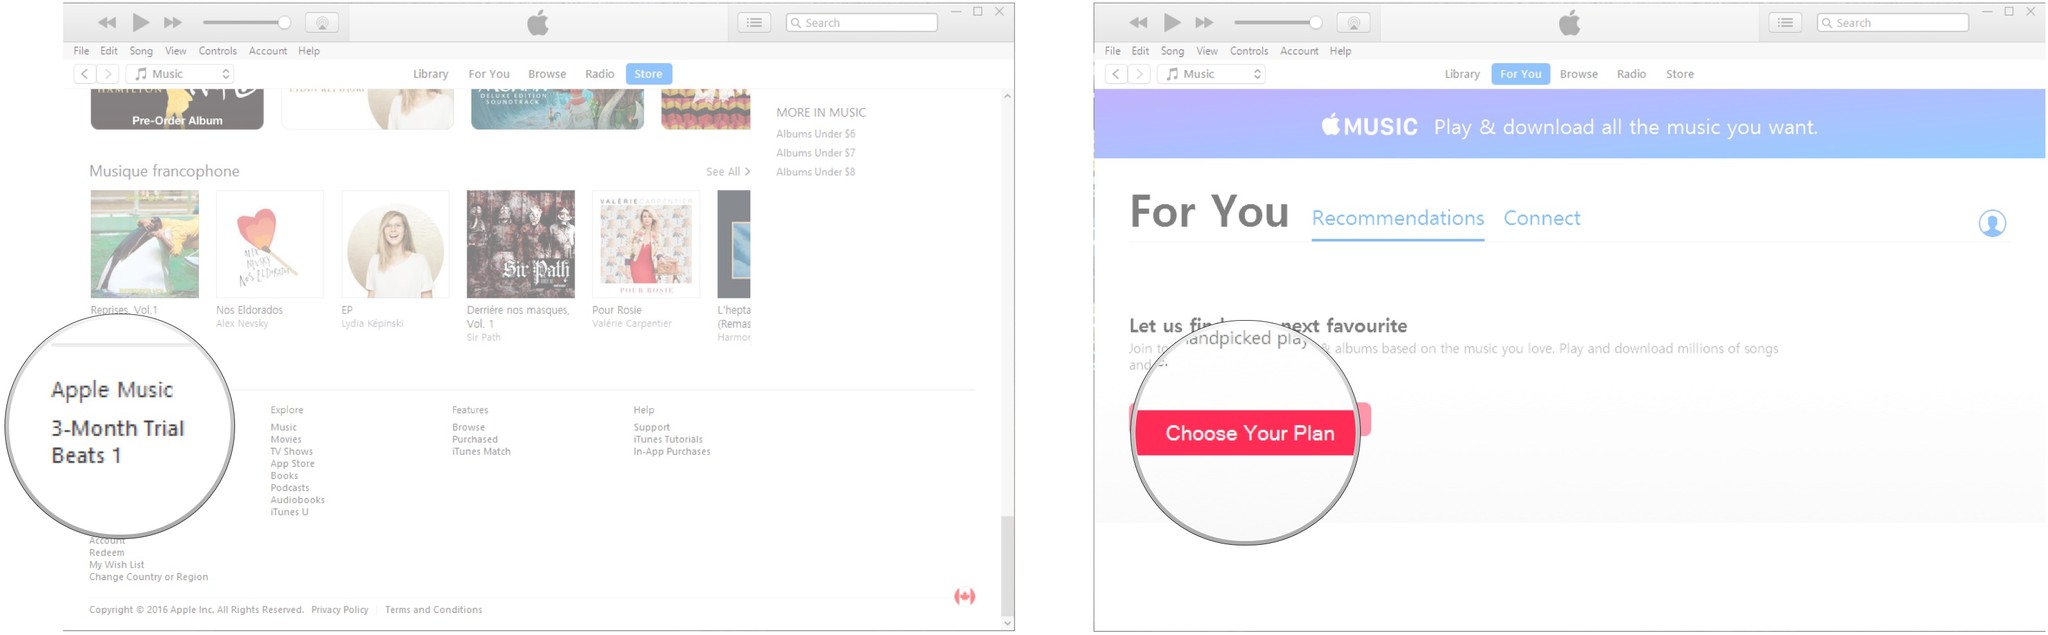
- Click a plan.
-
Click Kickoff Gratis iii Months.
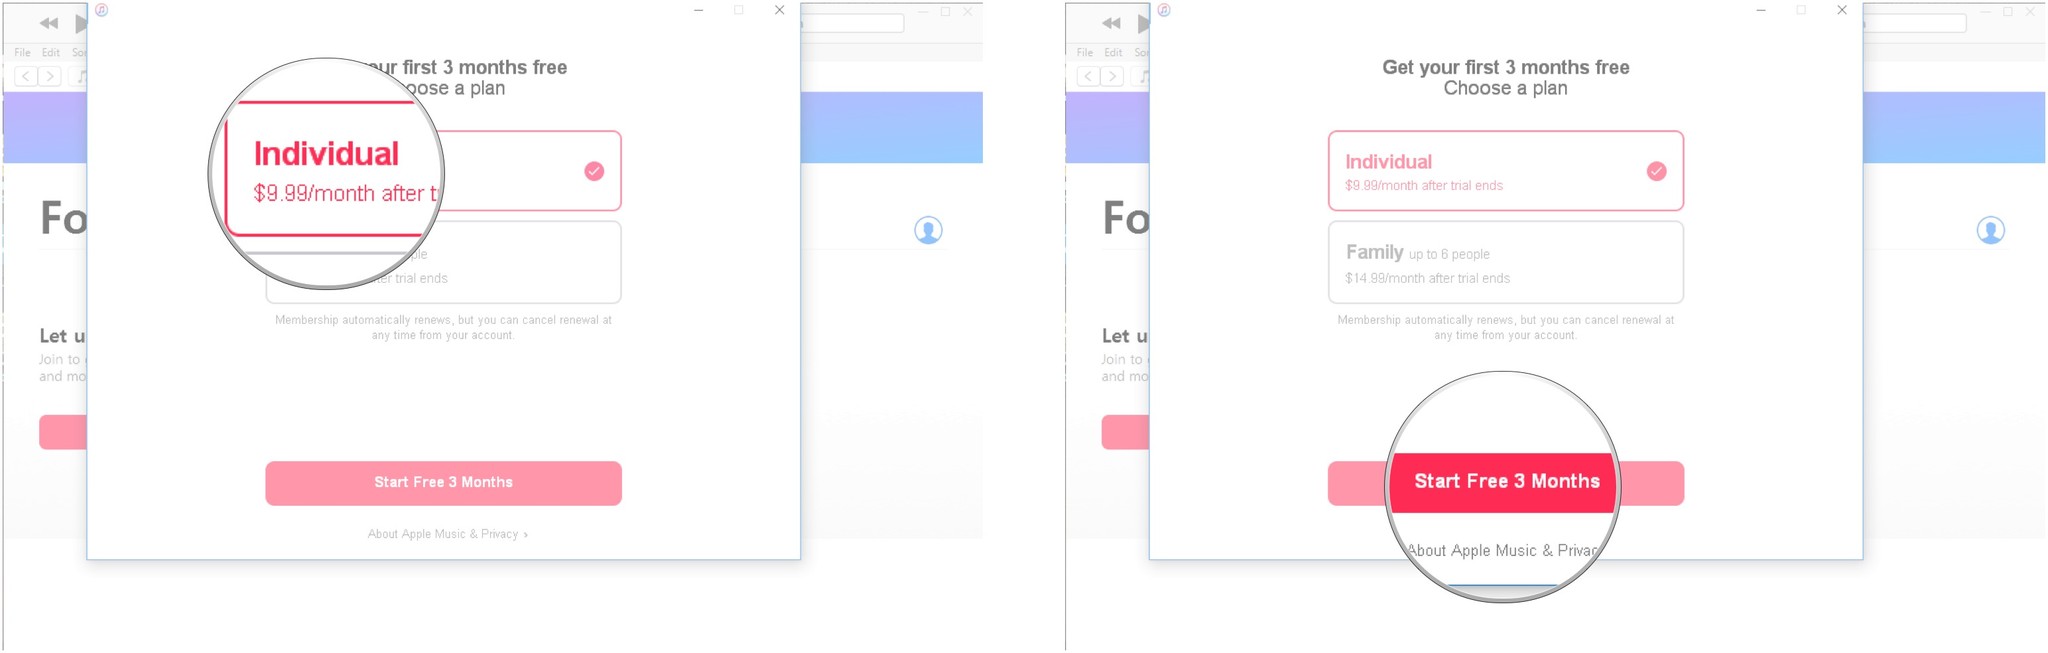
- Blazon your password.
- Click Buy.


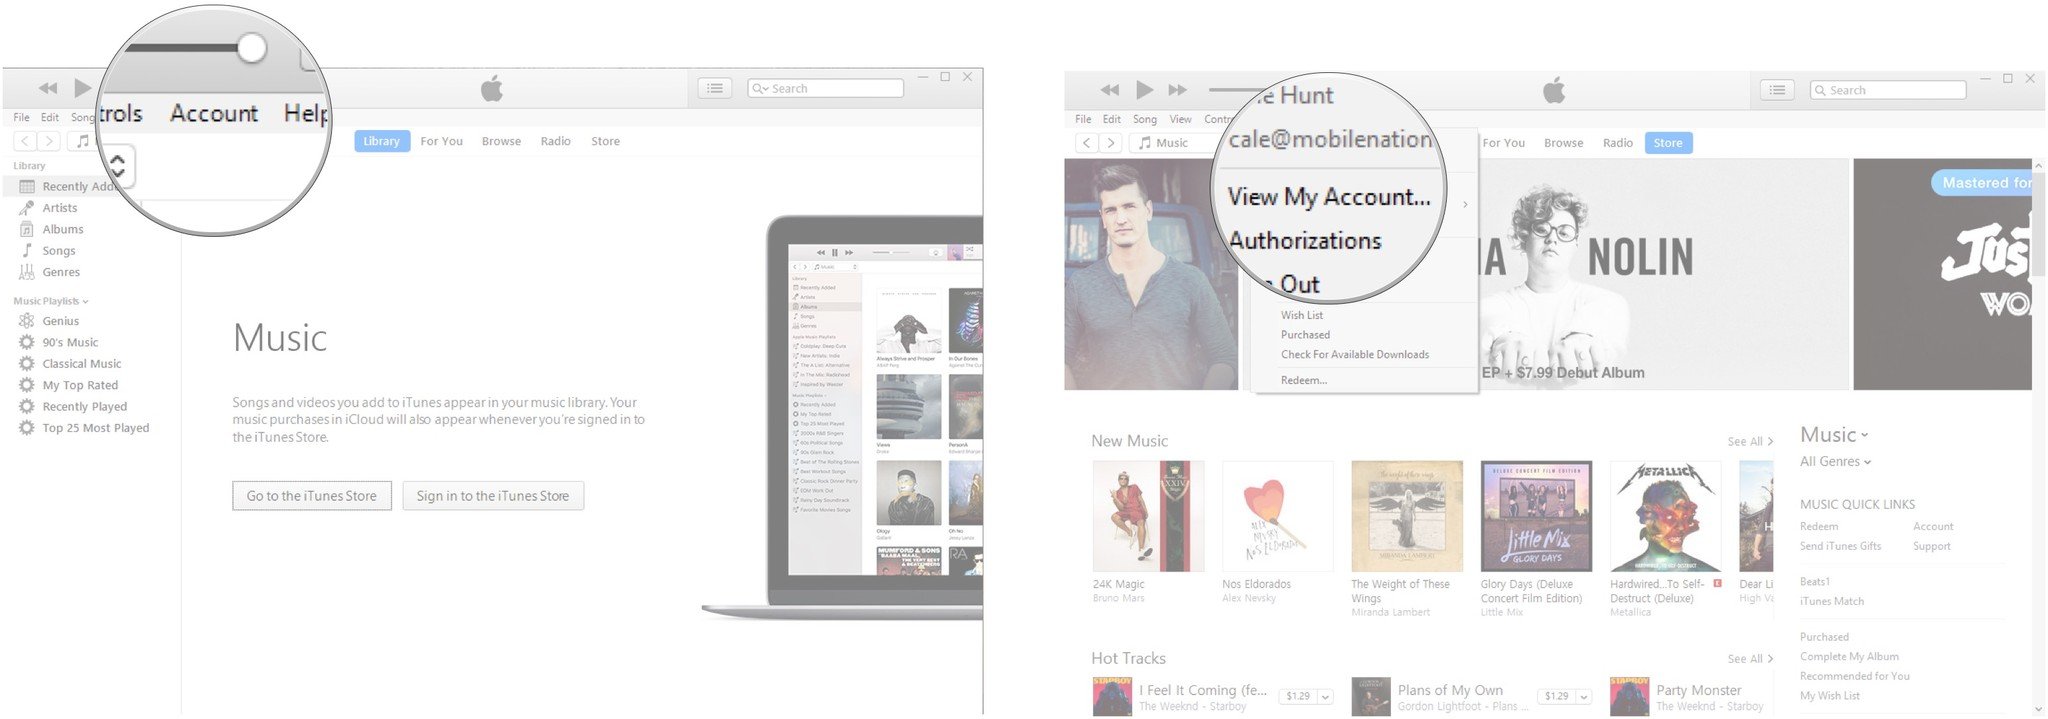
Apple Music, like iTunes Match, will automatically renew itself and you will be billed. Here's how to plough off automatic renewal of Apple tree Music.
- Launch iTunes from your desktop, Start menu, or taskbar.
- Click Business relationship from the carte nigh the top-left corner of the window.
-
Click View My Business relationship.
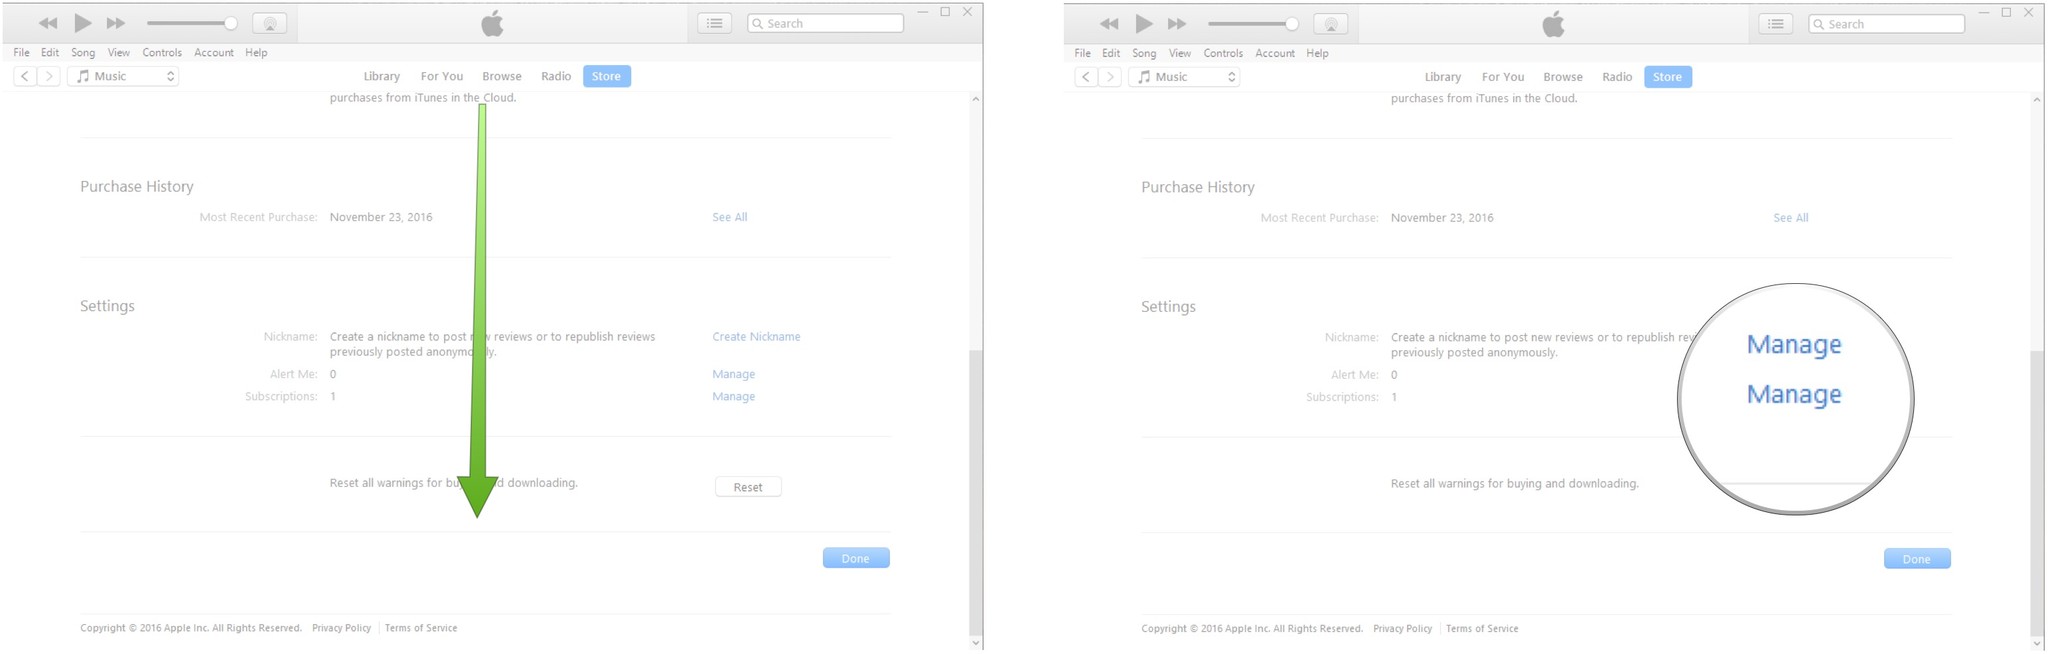
- Scroll down to the Settings row**.
-
Click Manage next to Subscriptions.
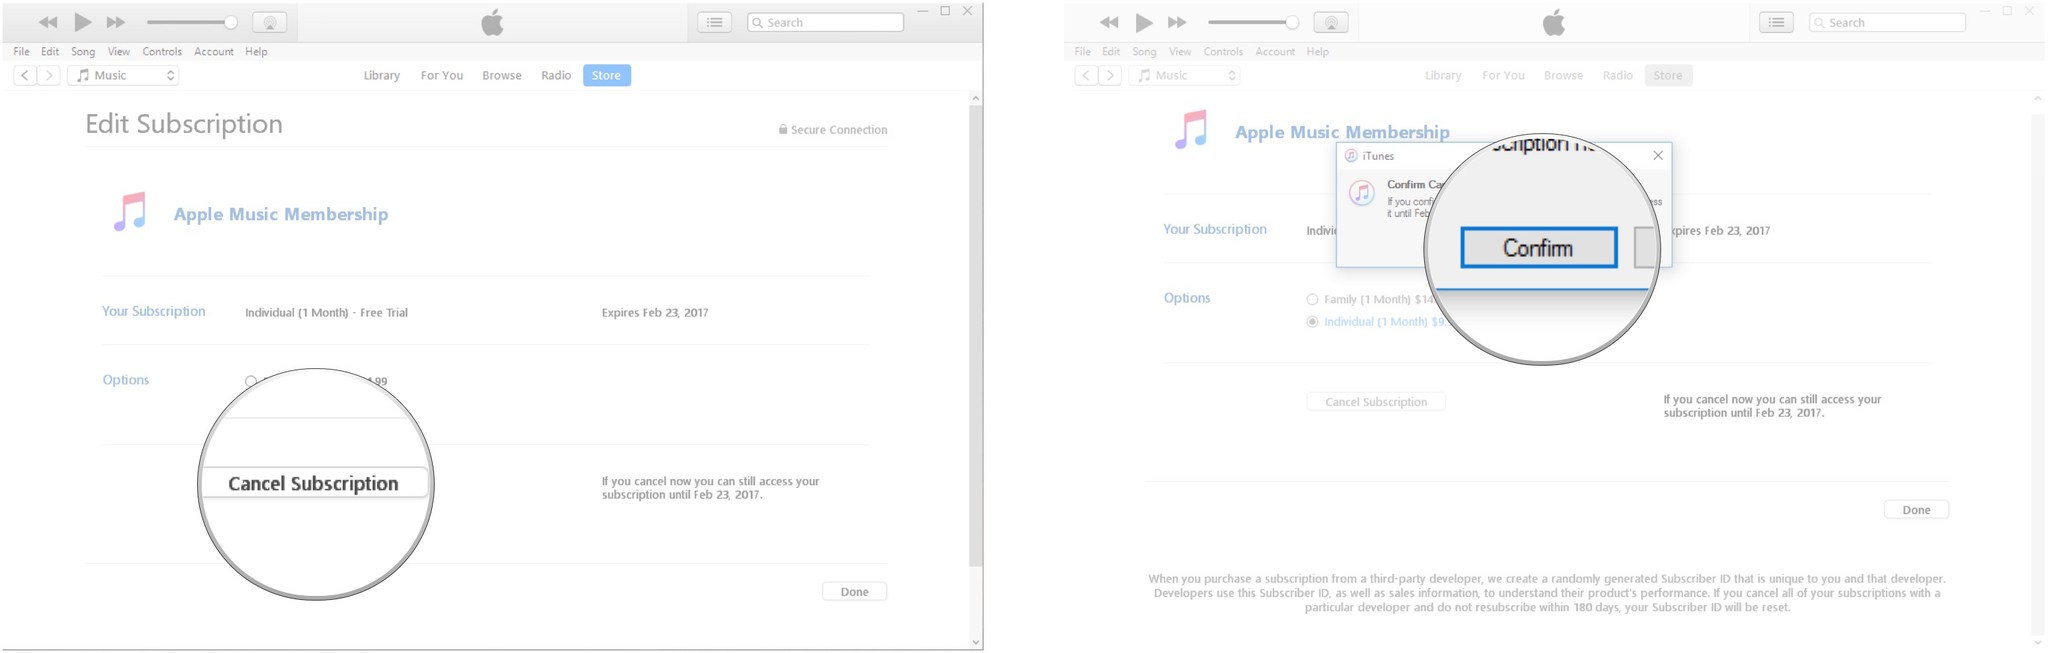
- Click Cancel Subscription below Apple Music Membership.
-
Click Confirm.


Wrapping upwardly
Exercise you use iTunes on your Windows 10 PC? Let us know in the comments section below! For more help with iTunes and Windows ten, cheque out the links beneath.
- More than iTunes aid
- More than Windows 10 help
This article was originally published on August 7, 2022. Information technology was recently updated in Dec 2022 with the following changes: screenshots and steps updated to reverberate changes in iTunes user interface.
Nosotros may earn a committee for purchases using our links. Acquire more.

Then speedy
Fancy new chips are cool but just Apple tree's Pro iPhones need them
Talk of Apple only putting its hot new A16 chip into the iPhone xiv Pro models has a lot of people hot under the collar. But really, it's a modify that makes more sense than you might recall. And it's definitely one that Apple shouldn't be agape of making, no matter how much the silicon junkies shout about it.

Source: https://www.imore.com/how-install-itunes-12-windows-10
Posted by: taylorhaplen.blogspot.com
0 Response to "How To Install Itunes On Windows Pc"
Post a Comment