

How To Install Tensorflow On Anaconda
Anaconda makes it easy to install TensorFlow, enabling your data science, machine learning, and artificial intelligence workflows.
But, It's frustrating to start installing all packages one-by-one after creating a new environment to install TensorFlow. Here we will learn how to install TensorFlow and also make use of your already pre-installed packages by cloning them to your new TensorFlow environment.
We will also set up the TensorFlow and implement MNIST classification with TF 2.0… Let's get down to business.
TensorFlow 2.0 focus on simplicity and ease of use, featuring updates like:
- Easy model building with Keras and eager execution.
- Robust model deployment in production on any platform.
- Powerful experimentation for research.
- Simplifying the API by cleaning up deprecated APIs and reducing duplication.
TF 2.0 has Keras API integrated with it. When you install TensorFlow Kears comes with it automatically. Keras is an extremely popular high-level API for building and training deep learning models.
Note: If you're new to TensorFlow don't worry about TF1.x just start off with the TF2.0 check TensorFlow website to get yourself started.
Let's start installing and setting up TensorFlow 2.0…
Python 3.6+ through Anaconda
Anaconda with Jupyter provides a simpler approach for installing Python and working on it.
Installing Anaconda is relatively straightforward.
1. Download Anaconda — Follow this link to download Anaconda.
Similar to pip, with Anaconda we have conda for creating virtual environments and installing packages.
After installed Anaconda — Open Anaconda prompt —
2. We can create an environment containing TF2 directly since Anaconda is supporting Tensorflow 2.0.0
Anaconda ships with a root environment, this is named as base. We are going to clone a new environment from it. (All the packages installed on base environment will now be present in the new environment).
conda create -n your-env-name --clone base
It may take some time to finish cloning depending on the number or the size of packages you have installed in the base environment.
After finished cloning,
3. Activate your environment
conda activate your-env-name
To confirm all packages as been cloned successfully — run the below command
conda list -n your-env-name
Before starting the TensorFlow installation, we will update pip
pip install --upgrade pip
4. Install TensorFlow 2.0
pip install --upgrade tensorflow
5. Test the installation
python -c "import tensorflow as tf; x = [[2.]]; print('Tensorflow Version ', tf.__version__); print('hello TF world, {}'.format(tf.matmul(x, x)))" The output will be (ignoring the system messages),
Tensorflow Version 2.0.0
hello TF world, [[4.]]
TensorFlow 2.0 Example: Basic classification: Classify images of clothing
We will train a neural network model to classify images of clothing, like sneakers and shirts.
This guide uses tf.keras, a high-level API to build and train models in TensorFlow.
import matplotlib.pyplot as plt import tensorflow as tf layers = tf.keras.layers import numpy as np print(tf.__version__)
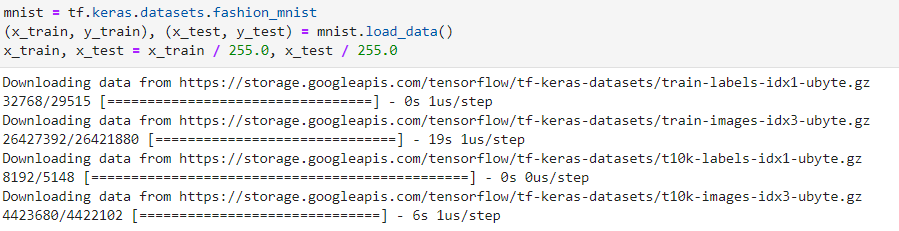
Download the fashion_mnist data from the tf open datasets and pre-process it.
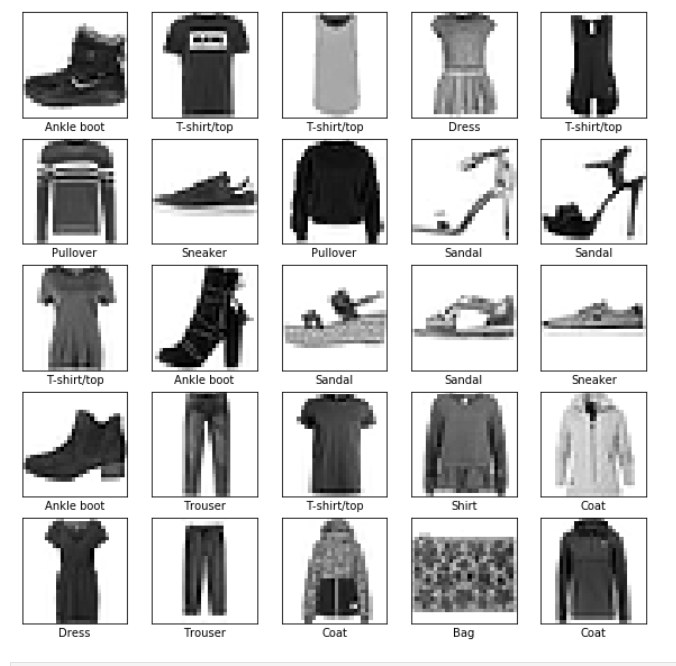
To see what we have in the data, we will plot a few examples from it.
          class_names = ['T-shirt/top', 'Trouser', 'Pullover', 'Dress', 'Coat', 'Sandal', 'Shirt', 'Sneaker', 'Bag', 'Ankle boot']plt.figure(figsize=(10,10))                      for            i            in            range(25):
            plt.subplot(5,5,i+1)
            plt.xticks([])
            plt.yticks([])
            plt.grid(False)
            plt.imshow(x_train[i], cmap=plt.cm.binary)
            plt.xlabel(class_names[y_train[i]])          plt.show()
The next thing to do now is, we will build the model layer-by-layer.
          model = tf.keras.Sequential()
model.add(layers.Flatten())
model.add(layers.Dense(64, activation='relu'))
model.add(layers.Dense(64, activation='relu'))
model.add(layers.Dense(10, activation='softmax'))          model.compile(optimizer='adam',
            loss='sparse_categorical_crossentropy',
            metrics=['accuracy'])          model.fit(x_train, y_train, epochs=5)
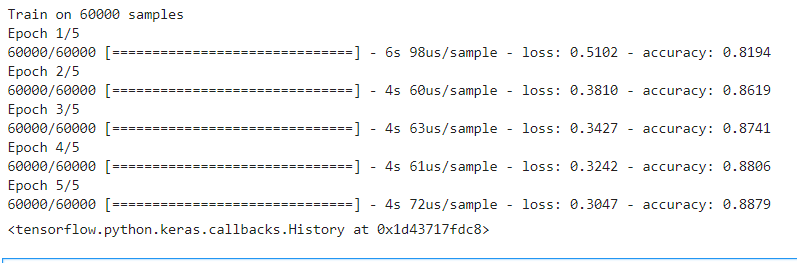
Note: We only trained on just five epochs because this model is only for demonstration.
Now let's test the model accuracy on the test data

Let's visualize one of the predictions.
          def plot_image(i, predictions_array, true_label, img):
            predictions_array, true_label, img = predictions_array[i], true_label[i], img[i]
            plt.grid(False)
            plt.xticks([])
            plt.yticks([])
            plt.imshow(img, cmap=plt.cm.binary)                      predicted_label = np.argmax(predictions_array)
            if predicted_label == true_label:
            color = 'blue'
            else:
            color = 'red'                      plt.xlabel("{} {:2.0f}% ({})".format(class_names[predicted_label],
            100*np.max(predictions_array),
            class_names[true_label]),
            color=color)          def plot_value_array(i, predictions_array, true_label):
            predictions_array, true_label = predictions_array[i], true_label[i]
            plt.grid(False)
            plt.xticks([])
            plt.yticks([])
            thisplot = plt.bar(range(10), predictions_array, color="#777777")
            plt.ylim([0, 1])
            predicted_label = np.argmax(predictions_array)
            thisplot[predicted_label].set_color('red')
            thisplot[true_label].set_color('blue')
            predictions = model.predict(x_test)          i = 0
plt.figure(figsize=(6,3))
plt.subplot(1,2,1)
plot_image(i, predictions, y_test, x_test)
plt.subplot(1,2,2)
plot_value_array(i, predictions, y_test)
plt.show()
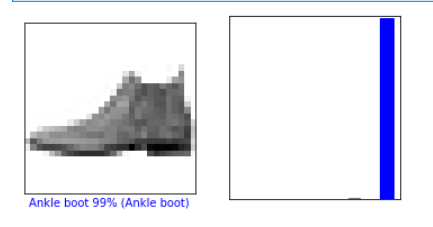
As shown in the plot above, the prediction probability of 'Ankle boot' is the highest. To further confirm, Let's print the predicted label as,
          predicted_label = class_names[np.argmax(predictions[0])]
print('Actual label:', class_names[y_test[0]])
print('Predicted label:', predicted_label) 
The GitHub repository with the MNIST example on TensorFlow 2.0 is here.
Conclusion
- We were able to install TensorFlow 2.0 along with all packages.
- We also went through a real MNIST data classification example with TF 2.0.
References
- What's coming in TensorFlow 2.0
- Train your first neural network: basic classification
How To Install Tensorflow On Anaconda
Source: https://medium.com/analytics-vidhya/install-tensorflow-2-0-along-with-all-packages-on-anaconda-for-windows-10-and-ubuntu-86a89ba51983
Posted by: taylorhaplen.blogspot.com
0 Response to "How To Install Tensorflow On Anaconda"
Post a Comment